承續上篇的用icon font來製作圖示, 之前所提到的都是利用現成的icon font, 但似乎大部分的icon font都沒有像material icon有支援ligatures, 沒支援的話, 在xcode裡面就無法像上一篇一樣, 直接在UI designer顯示對應的圖示, 另外如果需要使用自己的圖示呢?其實是有方法用SVG圖檔來製作自己的icon font的, 這篇就來介紹兩種用SVG圖檔製作一個有ligatures支援的字型檔

grunt-webfont

第一個方法就是利用grunt-webfont, Grunt是一個前端常用的建構工具, 而grunt-webfont是一個用來產生字型的task

安裝相關工具

由於需要使用Grunt, node.js是必須的, 另外由於需要使用到fontforge, 所以python也是必須的, 雖然說grunt-webfont也可以純nodejs的module來產生字型, 但那並無法支援ligatures, 所以fontforge是一定需要的

npm i grunt --global來安裝grunt

製作字型
  1. 建立一個空的目錄
  2. 在這個目錄執行npm init來產生package.json
  3. npm i grunt-webfont --save來安裝grunt-webfont並且把這個dependency 加到package.json
  4. 建立一個svg子目錄(目錄名稱隨你高興, 這邊以svg當例子), 把所有圖示的svg檔案全部放到這目錄去
  5. 建立Gruntfile.js , 這檔案就像是Makefile, 或像是build.gradle這樣的角色, 內容就像下面
module.exports = function(grunt) {

  grunt.initConfig({
    pkg: grunt.file.readJSON('package.json'),
    webfont: {
        icons: {
                src: 'svg/*.svg',
                dest: 'build/fonts',
                options: {
                        engine: 'fontforge',
                        htmlDemo: true,
                        fontHeight: 96,
                        normalize: false,
                        ascent: 84,
                        descent: 12,
                        font: 'octicon',
                        fontFamilyName: 'octicon',
                        types: 'ttf',
                        ligatures: true,
                        startCodepoint: 0xF101
                    }
                }
    },
    clean: [
        'build/fonts/*'
      ]
  });

  grunt.loadNpmTasks('grunt-contrib-clean');
  grunt.loadNpmTasks('grunt-webfont');
  grunt.registerTask('font', ['clean', 'webfont']);
  grunt.registerTask('default', [ 'font']);
};

這邊最主要也最重要的task就是webfont這個, 這裡面src是svg檔的目錄, dest是字型輸出的目錄, engine的部分指名fontforge, ligatures設定必須要是true(產生的字型的ligature的名字其實就是沿用svg的檔名)

建立好這個檔後執行grunt即可

icomoon

上面的方法還是有點麻煩, 蠻手動的, 還有一個更方便的工具就是icomoon, 這東西方便更多, 它是一個相當強大的工具

Icomoon

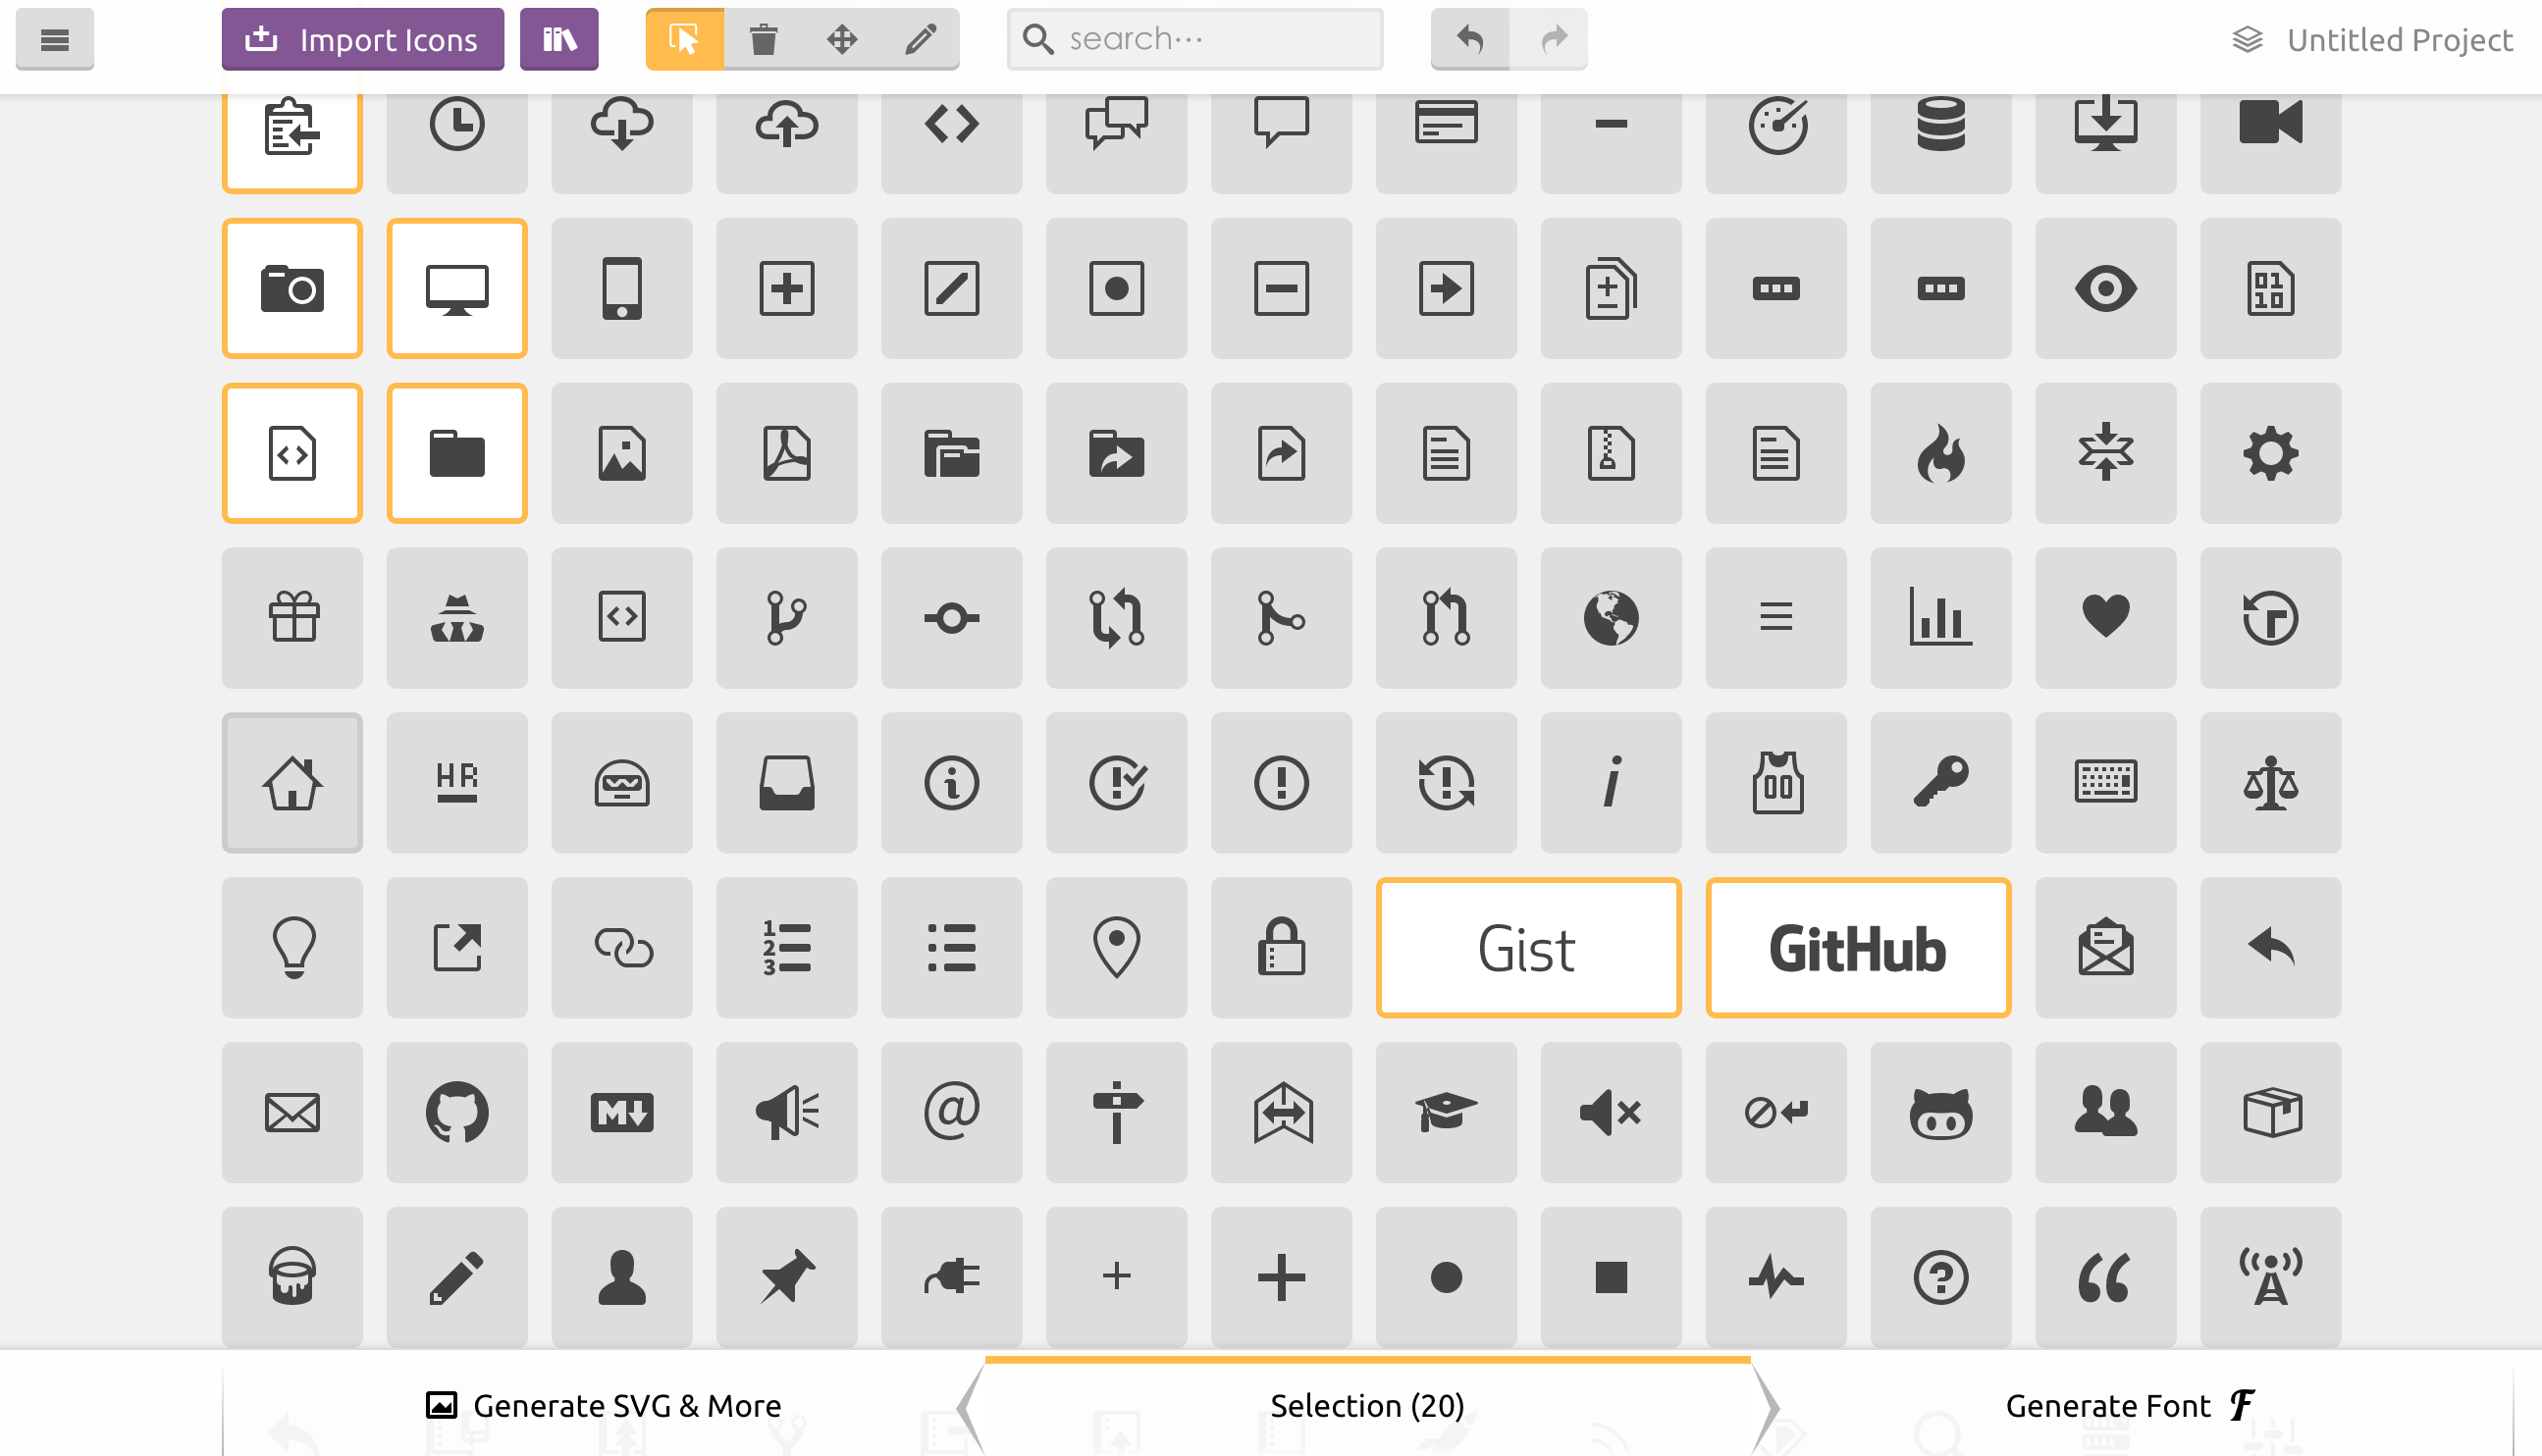
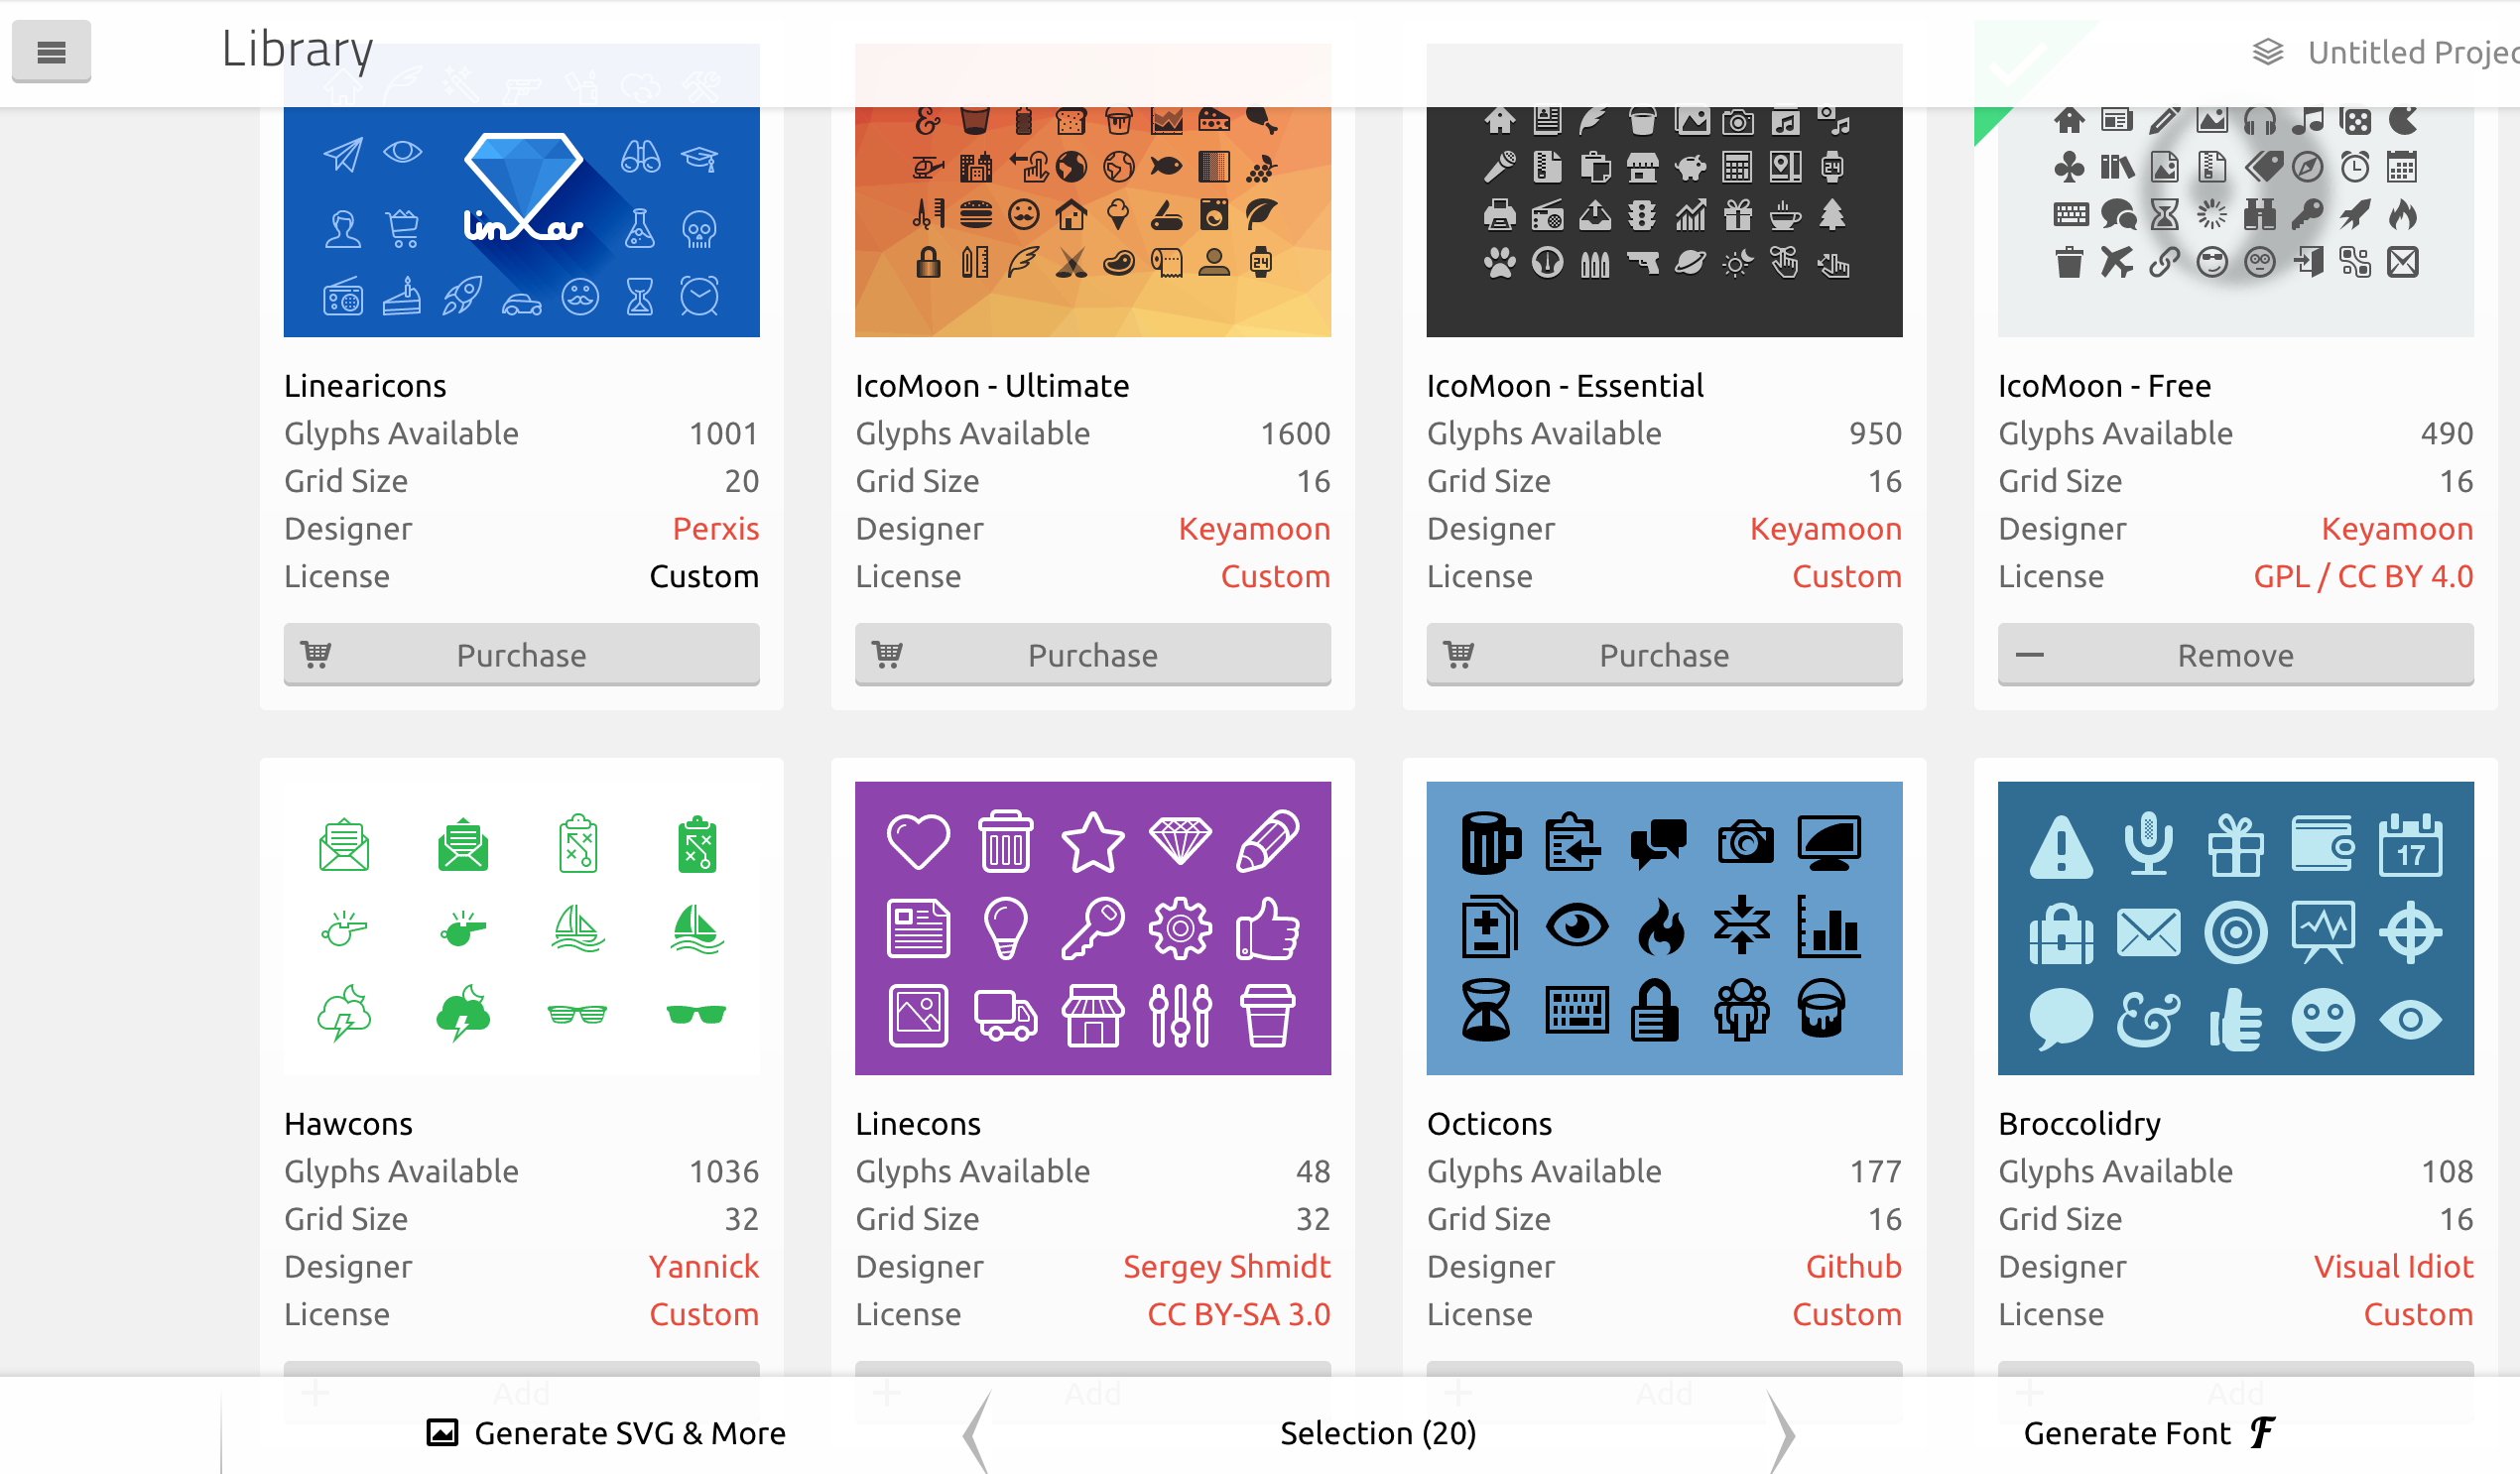
從畫面上看, 它其實很簡單操作, 選定你所需要的圖示後, 按右下角的Generate Font即可, 除了你可以自己import自己的svg檔案外, 它也提供很多付費跟免費的圖示供選用:

Icomoon

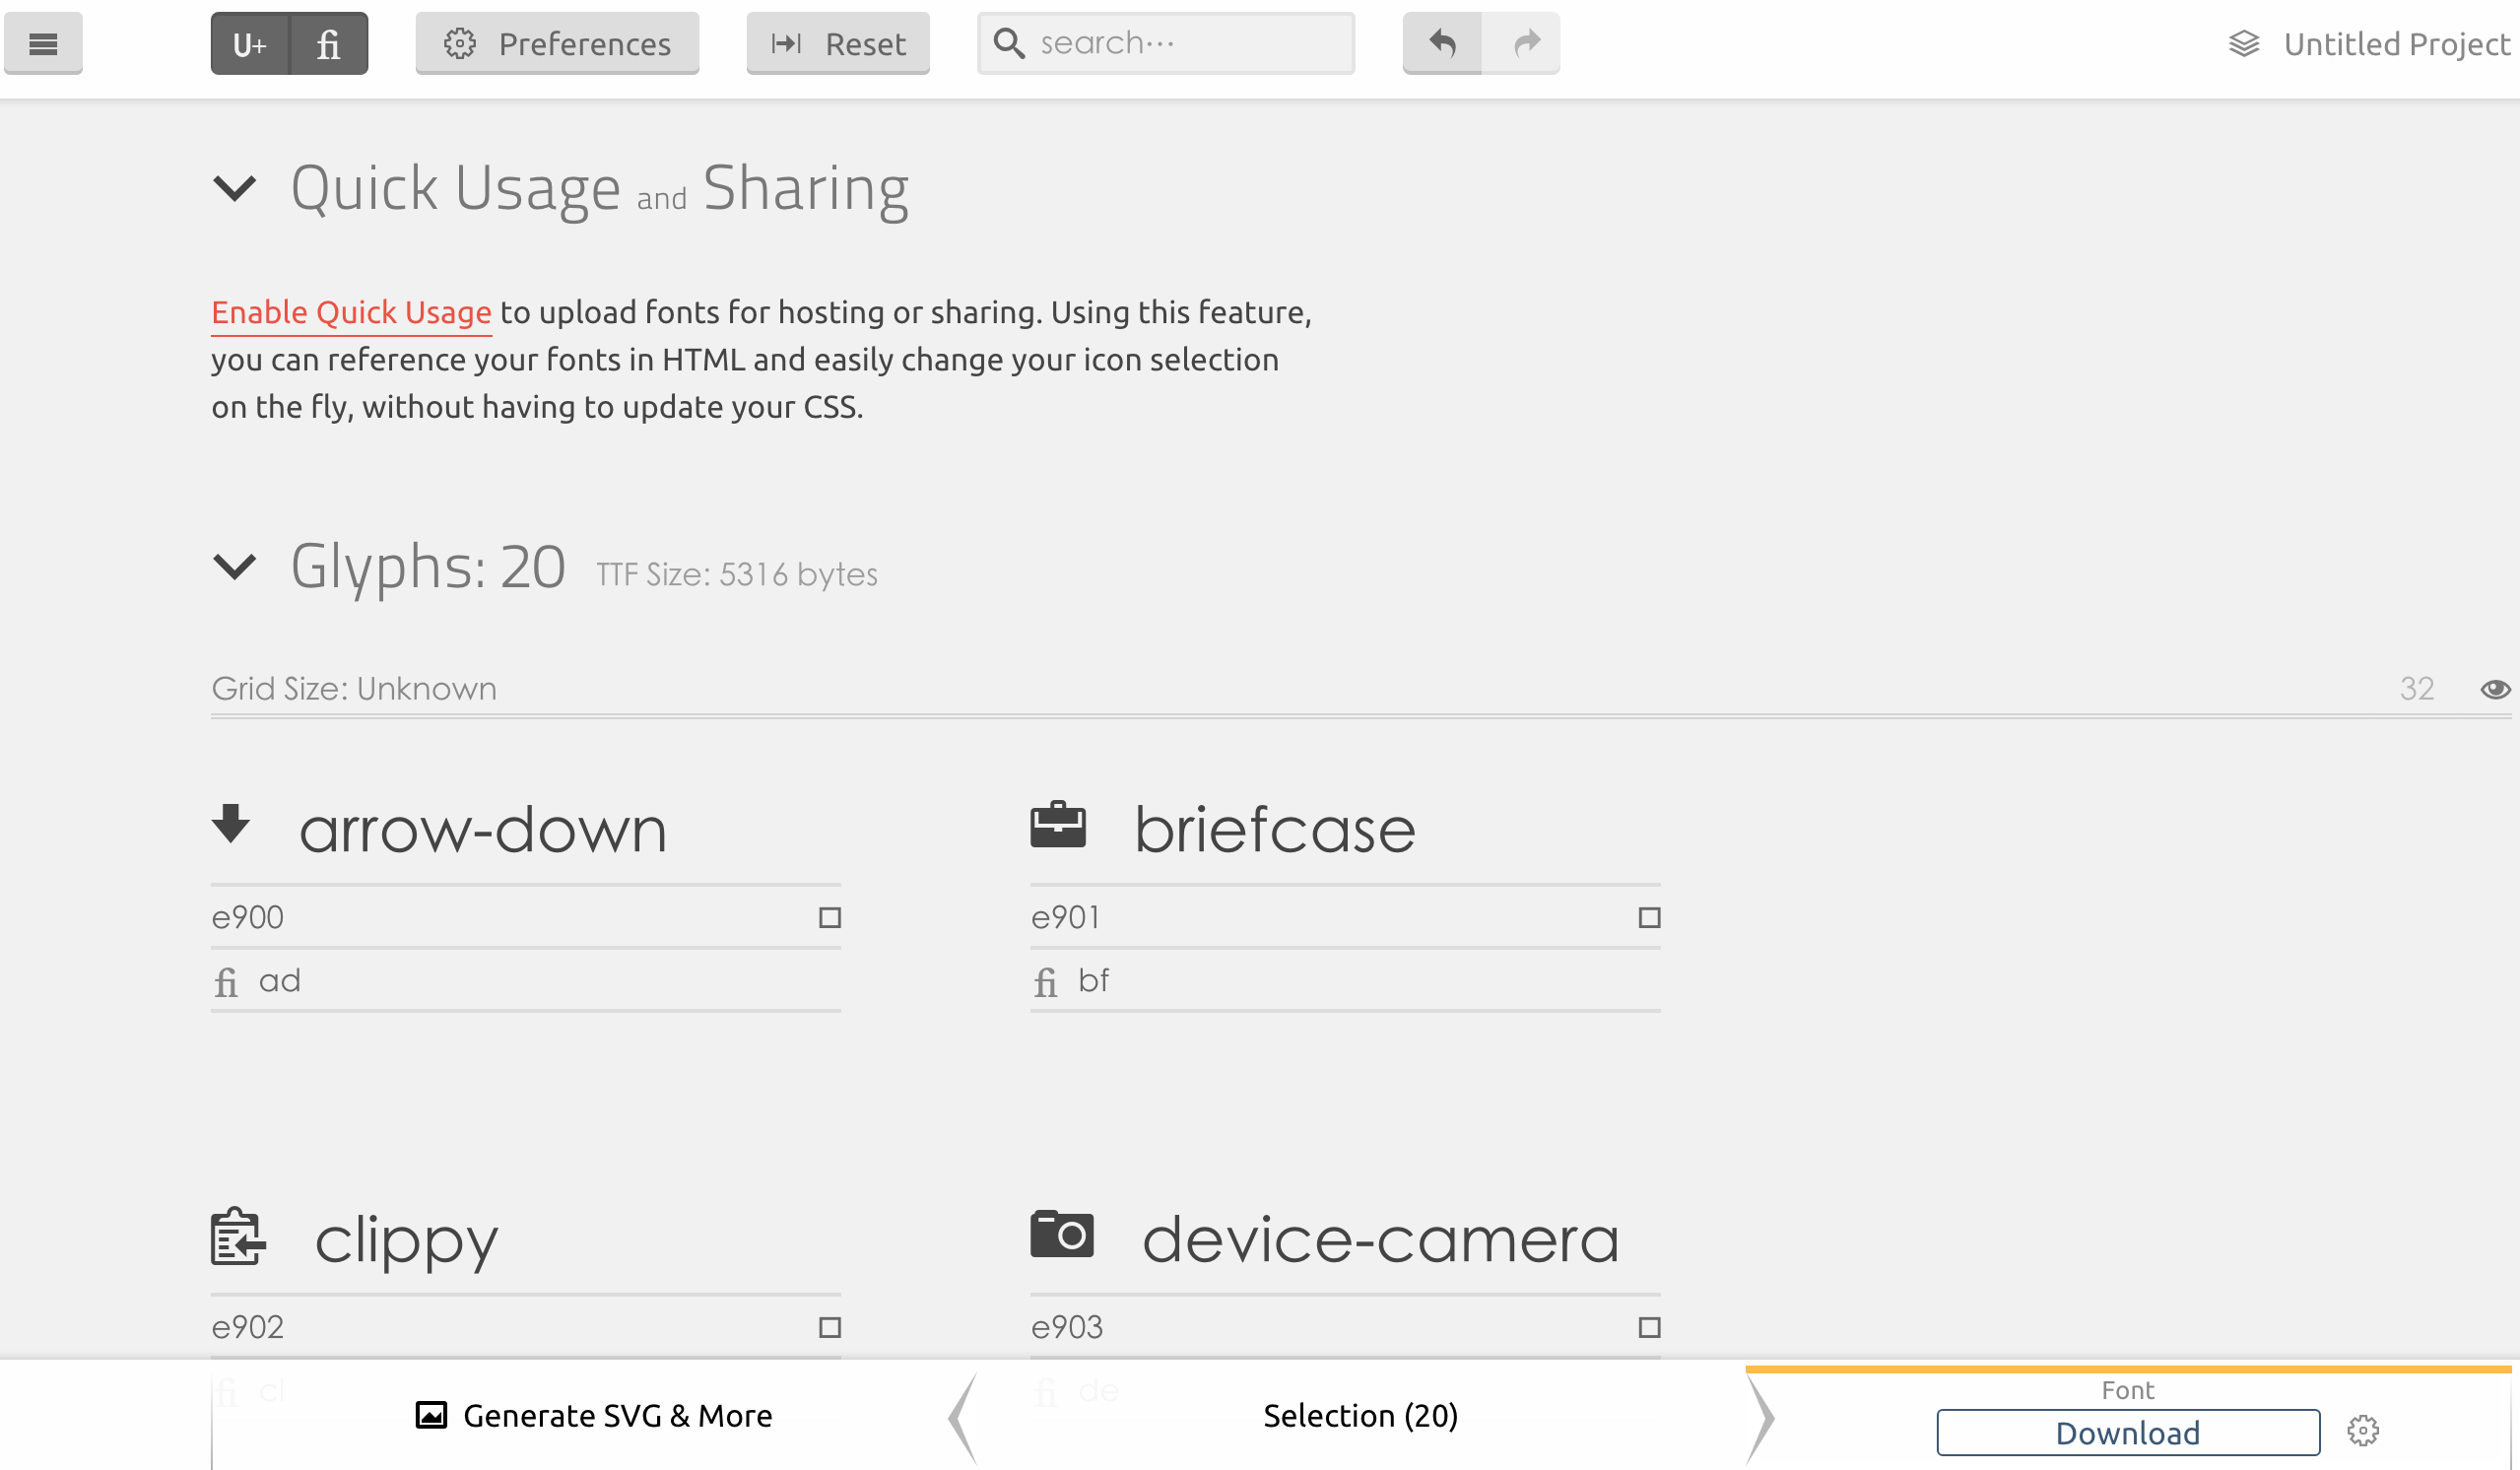
按下Generate Font後, 並不會馬上讓你下載字型回家, 它會先讓你檢視字型將會包含的圖示, 這邊有件事很重要, 左上角有個fi圖示(參照下圖), 按下去後, 下面的圖示下面會多一個fi的欄位, 這就是讓你設定這些圖示的ligature的, 如果需要一個有支援ligature的字型, 就需要去設定這邊

Icomoon

所有都沒問題後按下右下角的Download就沒問題了

先說在前面…不是鼓勵盜版, 也不是鼓勵去操掛人家網站, 這篇的出發點是單純好玩…起因是, 雖然現在大多數的人看漫畫都用布卡來看, 但布卡也不是所有漫畫都找的到, 上次聽到有人說布卡找不到某某漫畫, 就Google了一下, 總還是會有些網站有, 而且發現, 這些網站的結構都差不多, 所以就想說來寫個東西抓這些圖檔離線來看, 以下的技巧當然不只可以用在這用途上…

抓取這類的非結構性資料的網站, 最直覺的方式就是把html抓回來解析, 不過這類型的網站, 為了保護資料, 所以很多東西都寫在javascript中, 這樣光解析靜態的html是不夠的, 還要去搞懂怎從他程式中抓到想要的資料是很累人的, 不過, 不管用了多少html, javascript, css的技巧, 最終還是得把整個頁面畫到browser才能讓使用者看到, 也就是如果在瀏覽器上, 到最後還是會有一個完整的DOM tree讓我們從某個節點取得我們想要的資料

不過, 這樣聽起來好像還是工程浩大, 還得綁個瀏覽器? 其實不用, 只要靠 phantom.js 就好

PhantomJS is a headless WebKit scriptable with a JavaScript API. It has fast and native support for various web standards: DOM handling, CSS selector, JSON, Canvas, and SVG.

反正呢….就是…這個可以拿來做這用途, 把它當一個scriptable沒畫面的Browser就對了

接下來我們拿"看漫畫"(http://tw.seemh.com/)這網站來當個範例

以"夜王"這部漫畫(http://tw.seemh.com/comic/6563/)來說, 從url可以猜到6563是他的ID, 而進入這個link之中, 有一堆單行本的列表, 所以第一個打算當然是用程式取的這些列表跟他的url囉, 所以打開Chrome的開發人員工具

image

從這上面可以看到, 這些連結有個共通點, 就是它們的class都是"status0", 為了證實這一想法, 切到console用"document.querySelectorAll(’.status0’)“來測試一下:

image

Bingo!果然如此, 因此這就適合我們拿phantom.js來抓取了url, 因此我們可以採用以下的code (書名的class是book-title)

function getComics() {
   var url = 'http://tw.seemh.com/comic/6563/';
   page.open(url, function (status) {
       var book_title = page.evaluate(function() {
           var title = document.querySelector('.book-title');
           return title.innerText;
       });
       console.log(book_title);
       var elements = page.evaluate(function() {
           var elems = document.querySelectorAll('a.status0');
           var titles = [];
           for(var i=0;i<elems.length;i++) {
               titles.push({title:elems[i].title, url:elems[i].href});
           }
           return titles;
       });

       elements.forEach(function(arg, i) {
         console.log(arg.title);
       });
       console.log('end');
       phantom.exit();
   });
};

Phantom.js可以直接用page.evaluate()對網頁執行javascript, 因此我們可以在這之內用document.querySelector來取得我們所需要的節點

接下來進入每本單行版的頁面, 如 http://tw.seemh.com/comic/6563/75102.html , 這邊我們有興趣的是, 到底有幾頁, 以及, 圖片到底在哪?

所幸這也很簡單

image

頁面的資訊就在上方那條, 有個下拉選擇的部份, 用同樣的方法我們可知, 它的id是"pageSelect”, 因此, 我們可以以下面的方式取的頁面數量:

nPages = page.evaluate(function() {
    return document.getElementById('pageSelect').length;
});

而圖片的id則是"mangaFile", 透過同樣的方式也可以取得檔名

雖然在phantom.js可以用page.render來直接存圖檔, 但缺點是不能指定檔名跟存放位置, 所以我這邊的作法是直接輸出成shell script, 使用curl來做圖形抓取的動作

完整的範例在: https://github.com/julianshen/comic_grabber (沒完全測試, 可能有bug)

補充一點, phantom.js有個bug, 在evaluate裡的array如果傳到外面來用的話, 使用pop(), shift()會出問題, 這也就是範例中, 要先把array給變成JSON string再轉回去的原因

First, you need to follow this doc (http://developer.yahoo.com/cocktails/mojito/docs/quickstart/) to install Mojito as a global node module. Why install it globally? Because you need the Mojito command line to create your first app.

Create application with command line:

mojito create app mymojito

Change working directory to “mymojito”.

Create a “Procfile” whose content is:

web: mojito start $PORT

Use the following command to create an application on heroku and deploy codes to it.

  • git init
  • git add .
  • git commit -am init
  • heroku create mymojitotest –stack cedar
  • git push heroku master

After successfully commit codes to heroku, you could check running process with “heroku ps”. However, you cannot find any running process. That is because there is one important step missed:

heroku ps:scale web=1

This command adds one dyno for web process. After that, you will find one web process when you check with “heroku ps”. And the server is now started up. You can check your app with browser.