程式配置(Configuration)的熱更新(hot reload)應該是建置服務會常碰到一個題目, 常會有狀況需要在不動用release去調整程式配置的狀況, 比較常見的做法應該是將這些配置集中管理, 因此就有相關的解決方案產生像是:

真要找, 應該還有, 這種中央管理的方式, 無非就是想要把分布在不同系統的所有的設定, 做一個集中管理, 隨時可以進行線上更新, 不過帶來的問題點就是除了要綁定選定系統用相關的API開發外, 這類的服務也是有可能是SPOF

在Kubernetes原生(Kubernetes Native)的角度來看這件事, Kubernetes就有內建ConfigMap, Secret, 是否還有必要導入這類的解決方案? 利用ConfigMap是否可以達成線上做熱更新的目的? 我的想法是, 如果用ConfigMap做到熱更新, 那麼搭配 GitOps 的流程, 這樣就可以做到簡單又兼顧集中管理的特性了(更新紀錄在git都可以查到, 另外可以用PR確保更改配置的安全性, 避免誤更, 在多叢集配置下也可以分享同一個git repository)

使用ConfigMap

這邊沒特別要說明怎麼去用ConfigMap, 那個 官方文件 寫得很清楚, 先來看看ConfigMap在配合Pod/Deployment的兩個常見用法

先拿下面這範例來看:

apiVersion: v1
kind: ConfigMap
metadata:
  name: game-demo
data:
  # property-like keys; each key maps to a simple value
  player_initial_lives: "3"
  ui_properties_file_name: "user-interface.properties"

  # file-like keys
  game.properties: |
    enemy.types=aliens,monsters
    player.maximum-lives=5    
  user-interface.properties: |
    color.good=purple
    color.bad=yellow
    allow.textmode=true 

上面這個ConfigMap我們可以在Pod這樣使用它:

apiVersion: v1
kind: Pod
metadata:
  name: configmap-demo-pod
spec:
  containers:
    - name: demo
      image: alpine
      command: ["sleep", "3600"]
      env:
        # Define the environment variable
        - name: PLAYER_INITIAL_LIVES # Notice that the case is different here
                                     # from the key name in the ConfigMap.
          valueFrom:
            configMapKeyRef:
              name: game-demo           # The ConfigMap this value comes from.
              key: player_initial_lives # The key to fetch.
        - name: UI_PROPERTIES_FILE_NAME
          valueFrom:
            configMapKeyRef:
              name: game-demo
              key: ui_properties_file_name
      volumeMounts:
      - name: config
        mountPath: "/config"
        readOnly: true
  volumes:
    # You set volumes at the Pod level, then mount them into containers inside that Pod
    - name: config
      configMap:
        # Provide the name of the ConfigMap you want to mount.
        name: game-demo
        # An array of keys from the ConfigMap to create as files
        items:
        - key: "game.properties"
          path: "game.properties"
        - key: "user-interface.properties"
          path: "user-interface.properties"

一個是用valueFrom把ConfigMap裡面的設定拿來放在環境變數使用(參考上面範例)

另一個則是透過 volumes 把設定內容掛載成檔案

為了達成熱更新, 我們會有興趣的是, 當我們ConfigMap更新時, 相對應的內容會不會改變, 答案是只有第二種掛載成檔案的, 會隨之更新, 而第一種, 當ConfigMap更新時, 相關的環境變數是不會跟著變的

至於掛載成檔案的, 當ConfigMap內容做過更動時, 相對應的檔案內容也會更新, 但…不是即時的, 根據文件

The kubelet checks whether the mounted ConfigMap is fresh on every periodic sync. However, the kubelet uses its local cache for getting the current value of the ConfigMap. The type of the cache is configurable using the ConfigMapAndSecretChangeDetectionStrategy field in the KubeletConfiguration struct. A ConfigMap can be either propagated by watch (default), ttl-based, or by redirecting all requests directly to the API server. As a result, the total delay from the moment when the ConfigMap is updated to the moment when new keys are projected to the Pod can be as long as the kubelet sync period + cache propagation delay, where the cache propagation delay depends on the chosen cache type (it equals to watch propagation delay, ttl of cache, or zero correspondingly).

也就是說預期會有根據你設定是用watch, ttl-based, 全透過API取得更新跟cache時間造成的時間差, 也就是雖然ConfigMap也是一種集中式管理(放在etcd), 但實際上還是會有數秒到數十秒的更新時間差(我實測最多碰到一分鐘後才更新)

因此如果需要做到配置的熱更新, 那我們可以選擇是第二種掛載成檔案的作法, 藉由監控檔案內容的改變, 再由程式去做熱更新

觀測ConfigMap的異動狀況

既然是檔案, 那我們可不可以由Linux的inotify去監控檔案的異動狀況? inotify是Linux核心的一個系統呼叫, 現在主流伺服端的程式設計應該也比較少用C直接去呼叫這些System call了吧? 不過, 基本上還是可行的, 這邊有一篇"用 Sidecar 应用 Configmap 更新", 這邊就用 inotifywait 這個指令放在sidecar中去監控config檔案, 在有變動時, 發送訊號重啟主程序

這方法的優點是, 程式可以不用自行監控ConfigMap的變化, 缺點就是, 重啟這件事是不可控的, 當你的服務有多個實體(instance)時, 也有可能這些全部會在同一時間被重啟, 造成你的服務被下線

另外一個就是在程式內自行監控, 現在Kubernetes大行其道, 已然是顯學, 如果已經採用它來管理配置系統的話, 在設計上配合它來做, 也是無可厚非, Dev要能針對Ops來設計, 才能真的有DevOps, 更何況這部分只需要監控檔案, 並不需要綁死Kubernetes API

監控檔案異動的作法, 各語言有自己包裝, golang有fsnotify, Java則有nio裡的WatcherService

這邊先以Java Nio做一個簡單的測試(實際是以Kotlin實作):

suspend fun watchConfig(configFileName: String) {
	val dir:Path = Paths.get(configFileName).parent
	val fileName = Paths.get(configFileName).fileName

	val watcher = FileSystems.getDefault().newWatchService()

	dir.register(watcher, StandardWatchEventKinds.ENTRY_CREATE, StandardWatchEventKinds.ENTRY_DELETE, StandardWatchEventKinds.ENTRY_MODIFY)
	while(true) {
		val key =watcher.take()
		key.pollEvents().forEach { it ->
			if(it.context() == fileName) {
				reloadConfig()
			}
		}

		if(!key.reset()) {
			key.cancel()
			watcher.close()
			break
		}
	}
}

以前面config map掛載的範例來看的話, 假設, 我們用 watchConfig("/config/game.properties") 來監控"/config/game.properties", 這邊的"/config/game.properties"是由ConfigMap裡的 game.properties 來的, 所以變更這邊的game.properties, “/config/game.properties"也會跟著改變

但, 上面這段程式是"完全沒用的”, 即使 game.properties/config/game.properties內容都被改變了, 這邊的 reloadConfig() 也完全不會被觸發!!!! 如果使用golang的fsnotify, 也會是一樣的狀況

為什麼呢? 難道是這樣掛載的檔案有啥特異? 先來 ls -l看一下:

ls -l /config/game.properties
lrwxrwxrwx 1 root root 24 Aug 21 16:55 /config/game.properties -> ..data/game.properties

這邊可以發現/config/game.properties是一個Symbolic link連到..data/game.properties去, 這樣就導致我們監控不到它嗎? 其實還不只, 再來ls -l ..data看看

ls -l ..data
lrwxrwxrwx 1 root root 31 Aug 21 16:58 ..data -> ..2021_08_21_16_56_33.873456784

Ok, ..data也是一個Symbolic link, 所以實際上ConfigMap被變更過後, 真正檔案變更大guy會是這樣的:

CREATE ..2021_08_21_16_58_04.661956783
CREATE ..2021_08_21_16_58_04.661956783/game.properties
CREATE ..data_tmp (link to ..2021_08_21_16_58_04.661956783)
MOVE ..data_tmp ..data
DELETE ..2021_08_21_16_56_33.873456784

所以我們原本直覺應該會是認為它是會直接變更/config/game.properties內容, 但實際上/config/game.properties是一直沒被變動的, 它一直是一個連結到/config/..data/game.properties的Symbolic link, 所以觀測對象是不對的, 因此得這樣改:

suspend fun watchConfig(configFileName: String) {
	var path:Path = Paths.get(configFileName)
	val parent:Path = path.parent

	while (Files.isSymbolicLink(path)) {
		path = Files.readSymbolicLink(path)
	}

	val realParent:String = path.parent.name
	val watcher = FileSystems.getDefault().newWatchService()

	parent.register(watcher, StandardWatchEventKinds.ENTRY_CREATE, StandardWatchEventKinds.ENTRY_DELETE, StandardWatchEventKinds.ENTRY_MODIFY)
	while(true) {
		val key =watcher.take()
		key.pollEvents().forEach { it ->
			if(it.context() == realParent) {
				reloadConfig()
			}
		}

		if(!key.reset()) {
			key.cancel()
			watcher.close()
			break
		}
	}
}

這邊的realParent其實就是..data, 有變動的會是它, 所以監控它就好了

使用golang的spf13/viper

如果你是用golang並且是用sp13大神的viper, 來管理設定檔, 那你只需要透過viper.WatchConfig()來監控ConfigMap掛載下來的設定檔就好

viper.WatchConfig()
viper.OnConfigChange(func(e fsnotify.Event) {
	fmt.Println("Config file changed:", e.Name)
})

這是因為viper有針對這一狀況修正過, 有興趣可以參考“WatchConfig and Kubernetes (#284)”這段

Reloader

如果程式不想配合著改, 或大部分都是透過環境變數的方式來使用ConfigMap的話, 又怕使用前面inotify sidecar的作法會造成問題, 希望有更好的方式去RollOut, 那可以參考一下Reloader

Reloader會去監控ConfigMap跟Secret的變動, 來重啟跟他們有相關的DeploymentConfigs, Deployments, Daemonsets Statefulsets 和 Rollouts, 由於它是以Kubernetes conrtroller的形式存在, 並且採用Kubernetes API去監控資源: https://github.com/stakater/Reloader/blob/99a38bff8ea1346191b6a96583d3fbad72573ea5/internal/pkg/controller/controller.go#L47

安裝方法很簡單, 只需要用:

kubectl apply -f https://raw.githubusercontent.com/stakater/Reloader/master/deployments/kubernetes/reloader.yaml

裝到你所需要的namespace即可, 然後在你的Deployment設定上加上一個annotation reloader.stakater.com/auto: "true":

apiVersion: apps/v1
kind: Deployment
metadata:
  name: app
  annotations:
    reloader.stakater.com/auto: "true"

這樣reloader就會幫你監控這個Deployment用到相關的ConfigMap跟Secret, 不管是用環境變數的方式, 還是掛載檔案的方式, 都適用, 並且由於它是直接透過Kubernetes API, 因此ConfigMap或是Secret有變化都是即時會監測到, 然後它就會用rolling update的方式去重啟相關的instances, 相較之下會比用sidecar的方式保險

現在流行甚麼東西都要包成Docker image來部署, 每一個都要寫一個Dockerfile, 每個又很類似, 建置完程式碼又得立刻跑Docker來建置Docker image, 如果有更簡單的方法可以一次做完, 應該會省事很多

以下提到的這些方法可以一行Dockerfile都不用寫

使用gradle把Java application建置並包裝成Docker image

要達到這個目的, 可以使用 com.bmuschko.docker-java-application - https://bmuschko.github.io/gradle-docker-plugin/#java-application-plugin 這個Gradle plugin, 這個plugin會去呼叫Docker client API, 所以使用前確定你有啟動dockerd

先來看一下底下這範例, 這是一個用Ktor寫的server application:

val ktor_version: String by project
val kotlin_version: String by project
val logback_version: String by project

plugins {
    application
    kotlin("jvm") version "1.5.21"
    id("com.bmuschko.docker-java-application") version "6.7.0"
}

group = "co.jln"
version = "0.0.1"
application {
    mainClass.set("co.jln.ApplicationKt")
}

docker {
    javaApplication {
        baseImage.set("openjdk:11-jre")
        ports.set(listOf(8080))
        images.set(setOf("julianshen/myexamplekt:" + version, "julianshen/myexamplekt:latest"))
        jvmArgs.set(listOf("-Xms256m", "-Xmx2048m"))
    }
}

repositories {
    mavenCentral()
}

dependencies {
    implementation("io.ktor:ktor-server-core:$ktor_version")
    implementation("io.ktor:ktor-server-netty:$ktor_version")
    implementation("ch.qos.logback:logback-classic:$logback_version")
    testImplementation("io.ktor:ktor-server-tests:$ktor_version")
    testImplementation("org.jetbrains.kotlin:kotlin-test:$kotlin_version")
}

雖然是kotlin寫的, 不過這是一個標準的Java Application, 有它的main class, 我們要加上的只有 id("com.bmuschko.docker-java-application") version "6.7.0"docker {} 內的內容而已, 基本主要就是baseImage跟image的名字就好了

執行 gradle dockerBuildImage 就可以直接幫你把程式建置好並包裝成docker image了

如果是要把image給push到repository上的話, 執行 gradle dockerPushImage

如果你的不是一般的Java application 而是Spring boot application的話, 則是可以用 com.bmuschko.docker-spring-boot-application 這個plugin而不是上面那個, 不過如果是Spring boot 2.3之後, 還有另一個方法

直接把Spring Boot應用程式建置成Docker image

如果是Spring Boot 2.3之後, 因為內建就有支援 Cloud Native Buildpacks , 所以直接就可以建置成docker image , 蠻簡單的, 只要執行

gradle bootBuildImage

不過, 它image的名字會是 library/project_name , 所以如果你需要用其他的名字取代的話, 有兩種方法, 一種是加上 --imageName 給定名字, 像是:

gradle bootBuildImage --imageName=julianshen/springsample

另一種是把這段加到 build.gradle.kts 去(這邊以kotlin當範例):

tasks.getByName<org.springframework.boot.gradle.tasks.bundling.BootBuildImage>("bootBuildImage") {
	docker {
		imageName = "julianshen/sprintsmaple"
	}
}

這個的缺點是, 不像前面提到的plugin有支援push, 如果你需要把建置好的結果放到repository上的話, 就得自己執行 docker push

把Scala application包裝成Docker image

如果是Scala就需要用到 SBT Native Packager

用法也不難, 首先先把下面這段加到 plugins.sbt 去:

addSbtPlugin("com.typesafe.sbt" % "sbt-native-packager" % "1.7.6")

build.sbt 內加入:

enablePlugins(DockerPlugin)

然後執行 sbt docker:publishLocal即可, 相關設定可以參考 Docker plugin的文件

自從離職後, 就沒一個方便的環境可以來做實驗, 家裡的desktop要裝k8s雖然是夠, 但出門的話, 我只有一台六七年的notebook改了SSD裝了Linux, 還是想在這台NB裝K8S拿來玩一些東西

MicroK8s

MicroK8s 算是一個不錯的選擇, 輕量化, 單機可以跑, 重要的是, 可以隨時開關, 對於我這台老電腦來說, 需要的時候再開就好

安裝方式很簡單(Linux下需要先有snap):

sudo snap install microk8s --classic

使用 microk8s status 可以看目前狀態, microk8s start可以開始執行, microk8s stop即可停止

# microk8s status
microk8s is not running, try microk8s start
# microk8s start
[sudo] password for julianshen:            
Started.
# microk8s status
microk8s is running
high-availability: no
  datastore master nodes: 127.0.0.1:19001
  datastore standby nodes: none
addons:
  enabled:
    cilium               # SDN, fast with full network policy
    dashboard            # The Kubernetes dashboard
    dns                  # CoreDNS
    ha-cluster           # Configure high availability on the current node
    helm                 # Helm 2 - the package manager for Kubernetes
    helm3                # Helm 3 - Kubernetes package manager
    ingress              # Ingress controller for external access
    metrics-server       # K8s Metrics Server for API access to service metrics
    prometheus           # Prometheus operator for monitoring and logging
    registry             # Private image registry exposed on localhost:32000
    storage              # Storage class; allocates storage from host directory
  disabled:
    ambassador           # Ambassador API Gateway and Ingress
    fluentd              # Elasticsearch-Fluentd-Kibana logging and monitoring
    gpu                  # Automatic enablement of Nvidia CUDA
    host-access          # Allow Pods connecting to Host services smoothly
    istio                # Core Istio service mesh services
    jaeger               # Kubernetes Jaeger operator with its simple config
    keda                 # Kubernetes-based Event Driven Autoscaling
    knative              # The Knative framework on Kubernetes.
    kubeflow             # Kubeflow for easy ML deployments
    linkerd              # Linkerd is a service mesh for Kubernetes and other frameworks
    metallb              # Loadbalancer for your Kubernetes cluster
    multus               # Multus CNI enables attaching multiple network interfaces to pods
    openebs              # OpenEBS is the open-source storage solution for Kubernetes
    openfaas             # openfaas serverless framework
    portainer            # Portainer UI for your Kubernetes cluster
    rbac                 # Role-Based Access Control for authorisation
    traefik              # traefik Ingress controller for external access

如果是正在執行的狀態下, microk8s status 可以看到有哪些可用的addon, 如果要啟動其中一個addon(例如trafik), 也只要執行 microk8s enable traefik, 非常簡單

最基本來說, 你可以使用 microk8s kubectl 來執行相關的 kubectl指令, 如果要方便的GUI界面來管理的話, 也可以透過啟動dashboard:

# microk8s enable dashboard
Enabling Kubernetes Dashboard
Addon metrics-server is already enabled.
Applying manifest
serviceaccount/kubernetes-dashboard created
service/kubernetes-dashboard created
secret/kubernetes-dashboard-certs created
secret/kubernetes-dashboard-csrf created
secret/kubernetes-dashboard-key-holder created
configmap/kubernetes-dashboard-settings created
role.rbac.authorization.k8s.io/kubernetes-dashboard created
clusterrole.rbac.authorization.k8s.io/kubernetes-dashboard created
rolebinding.rbac.authorization.k8s.io/kubernetes-dashboard created
clusterrolebinding.rbac.authorization.k8s.io/kubernetes-dashboard created
deployment.apps/kubernetes-dashboard created
service/dashboard-metrics-scraper created
deployment.apps/dashboard-metrics-scraper created

If RBAC is not enabled access the dashboard using the default token retrieved with:

token=$(microk8s kubectl -n kube-system get secret | grep default-token | cut -d " " -f1)
microk8s kubectl -n kube-system describe secret $token

In an RBAC enabled setup (microk8s enable RBAC) you need to create a user with restricted
permissions as shown in:
https://github.com/kubernetes/dashboard/blob/master/docs/user/access-control/creating-sample-user.md

# microk8s dashboard-proxy 
Checking if Dashboard is running.
Dashboard will be available at https://127.0.0.1:10443
Use the following token to login:
[TOKEN]

不過, 我個人是比較偏好用Lens

Lens

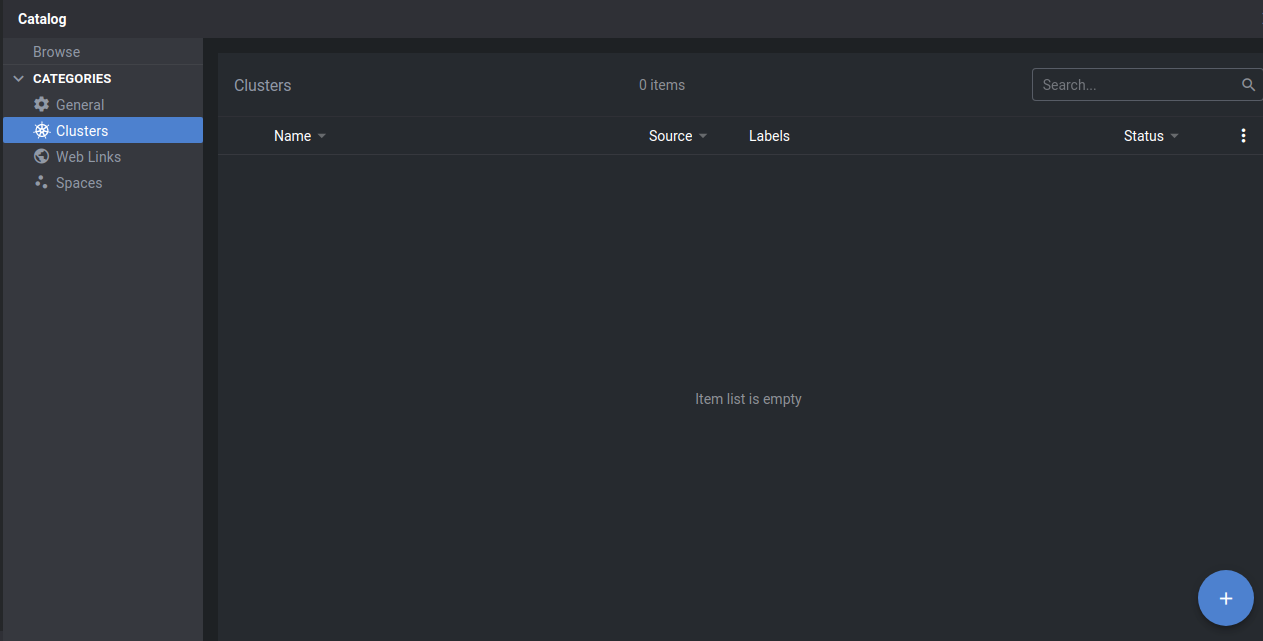
Lens的界面蠻簡單直覺的, 功能也蠻強大的, 除了管理你的cluster外, 也可以作到簡單的監控, 同時也可以管理多個cluster, 在啟動Lens後, 到"Clusters Catalog", 會發現沒有任何的一個cluster, 也沒有剛剛啟動的MicroK8S cluster

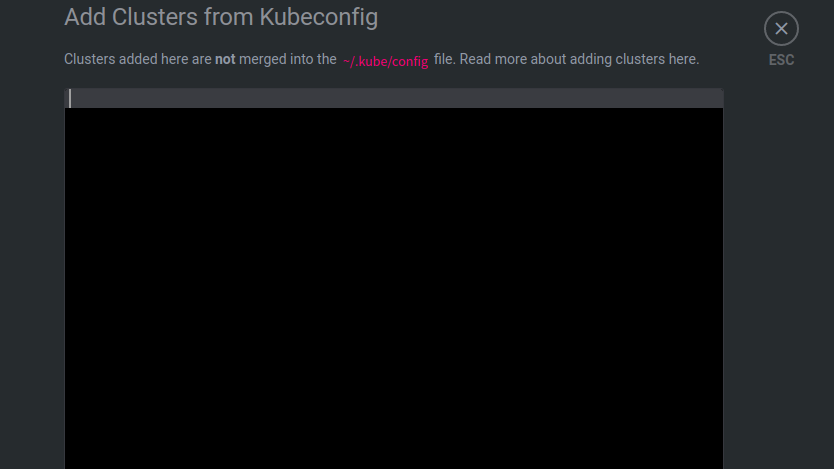
有兩個方法可以加入剛剛創建的MicroK8s cluster, 第一個是按下那個"+“按鈕:

這時候把k8s config貼進去就好, 這邊要注意的一點是, 本來獲取k8s config可以用 kubectl config view , 在MicroK8s下, 如果沒特別設定, 都是用 microk8s kubectl 取代 kubectl, 但這邊, 如果你用 microk8s kubectl config view 去取得k8s config的話, 貼上去, Lens是會連不上你的cluster的

這邊應該用 microk8s config才對, 這個才能讓你的Lens正確連上

另一個方式是執行 microk8s config > ~/.kube/config , 這樣Lens就會自動抓到了, 這兩種的優缺點是, 直接在Lens設定k8s config的話, 管理多個clusters時, 可以不用一直切換context, 如果直接使用 “.kube/config” 的話, 則是, 你也可以直接使用 kubectl來操作你的cluster(就不需要用microk8s kubectl)

最後要做的步驟就是連接了, 按下"Connect"即可

在MicroK8s這邊, 要記得enable prometheus , Lens會去偵測Prometheus operator並抓取相關的metric資訊顯示在界面上

本來我寫blog畫流程圖都用Mermaid, 不過由於不好預覽, 要畫比較複雜的圖也有點麻煩

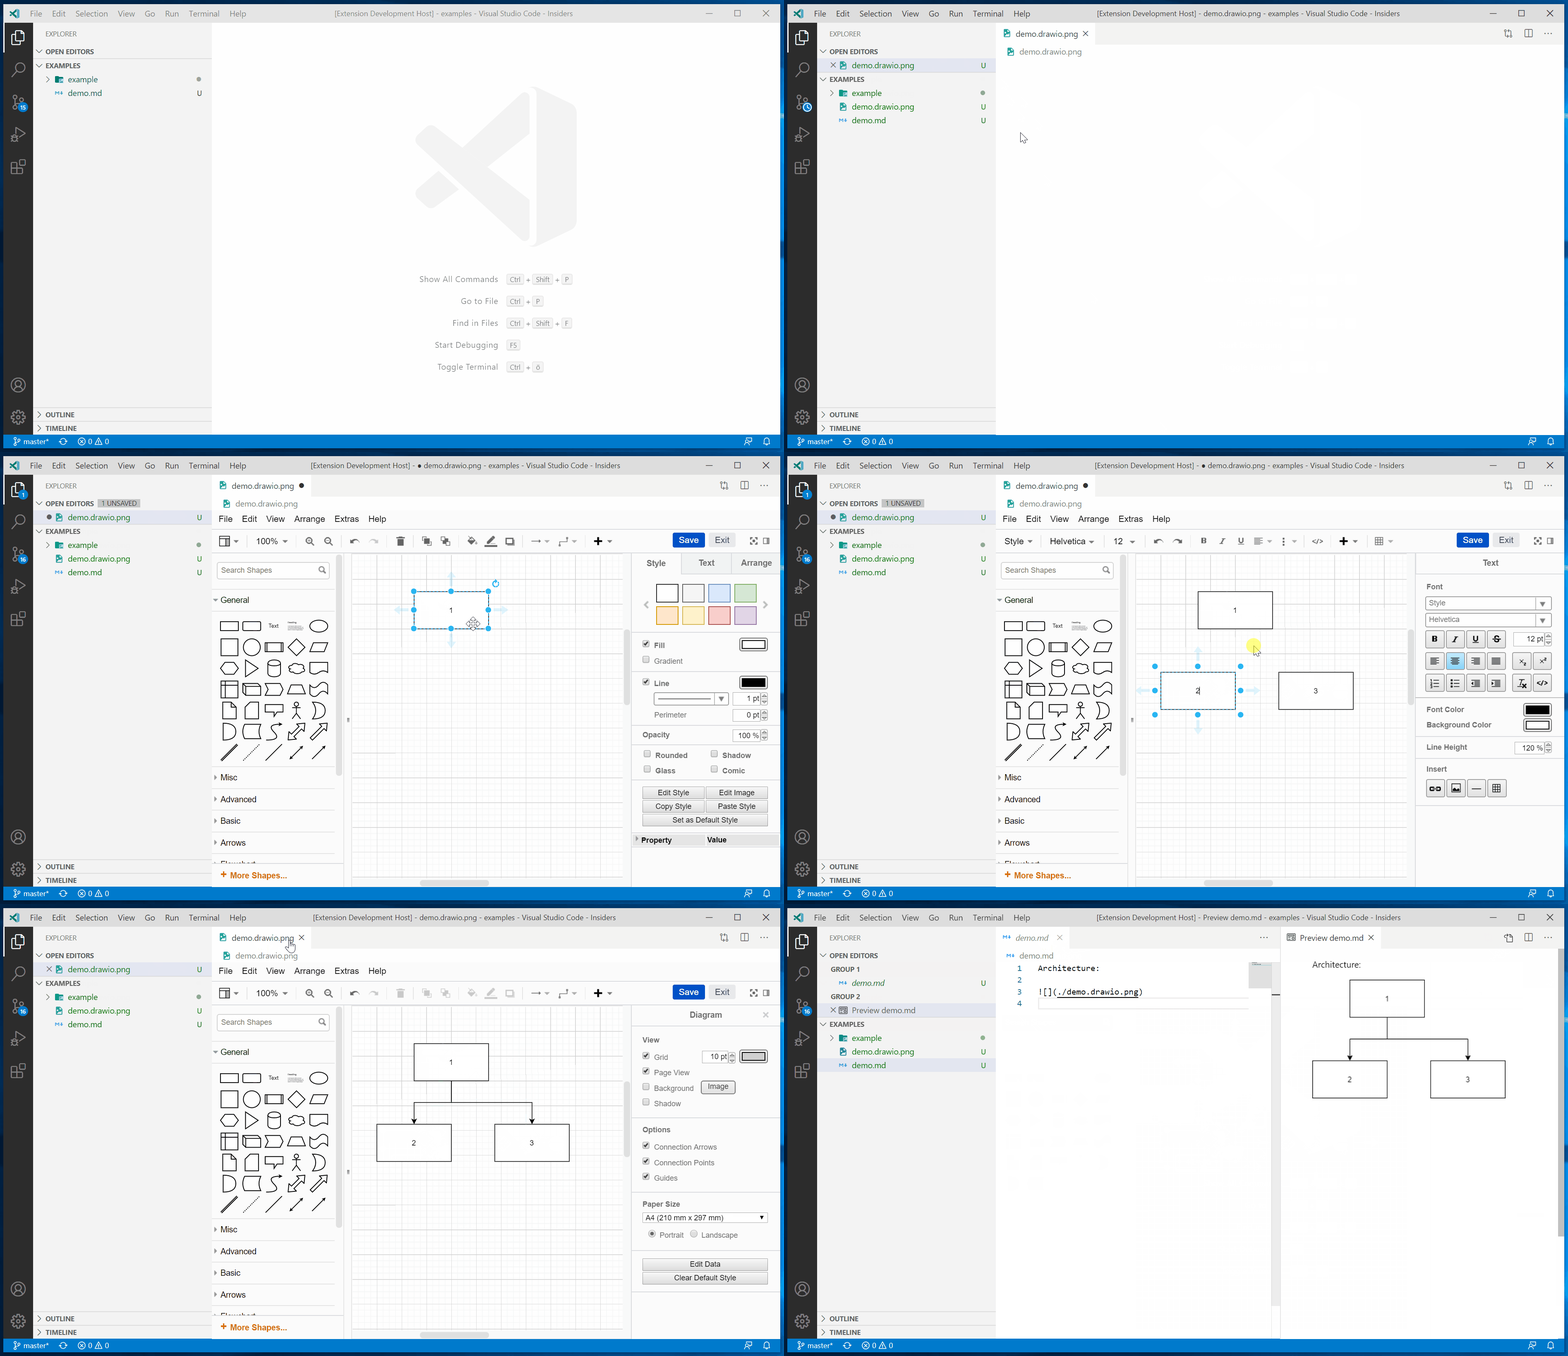
Draw.io是一個不錯的免費工具, 蠻便利好用的, 但缺點就是是網頁版的, 要跟平常寫文章的流程整合比較不方便, 由於我是在vscode上寫文章的, 所以發現了 Draw.io Integration 這個vscode的extension, 蠻方便的

除了可以直接在vscode上編輯流程圖外, 如果你的檔名是"XXXX.drawio.png", 或是 “XXXX.drawio.svg” 畫完後就直接輸出成png/svg, 就可以直接拿來用了, 有問題也可以直接改, 不用轉檔轉來轉去的

在離職前一周研究的一個小題目, 說小其實也蠻難搞的, 搞到這兩天重新看, 才釐清完整做法

難搞的原因有幾個, 雖然OpenTelemetry有支援gRPC, 但對於 Thrift 就沒人做相關的支援了, 再來就是系統環境跨了nodejs和Finagle/Scala兩種平台, Thrift 是用在這兩者之間的溝通, Finagle雖是有支援ZipKin做分散式追蹤, 但那僅限於Finagle client呼叫Finagle server的部分才有支援在這之間傳遞追蹤資訊, 跨nodejs (client) 到 Finagle (server), 這邊也一樣找不到啥資訊

所以這邊主要會想做到的:

  1. 自動插入追蹤的程式碼
  2. 在 Thrift client/server 間傳遞追蹤資訊 (client/server不同平台)

大致上的原理有做過些小實驗, 確定應該可行, 只是懶得把整套完整做好就是了

分散式追蹤 Distributed Tracing

在大型的分散式系統, 一個從使用者端來的request通常都會被分發到不同的系統去做處理, 尤其現在大多流行微服務(Micro services)架構, 這種狀況相當的常見, 當問題發生的時候, 到底甚麼時間點在哪個系統, 碰到甚麼事, 要追查原因便得從這麼多系統分散且看不出關聯性的log去想辦法分析出來, 因此導入分散式追蹤, 就是為了解決這問題

最早出現應該是Google內部使用的Dapper, 也有發表相關的論文, 開源的部分, 早期又有Twitter的ZipKin和Uber的Jaeger, 前面有提到的Finagle, 由於也是Twitter開源出來的應用程式框架, 所以Finagle出廠就支援ZipKin也是理所當然的

後來又出現想要大一統的OpenTracingOpenCensus, 這兩個後來又被大一統到這邊所要提到的OpenTelemetry

做Distributed Tracing雖然對追問題會有幫助, 但要導入並不見的容易, 先是要在所有要追蹤的插入追蹤程式碼, 對於既有系統的改動幅度自是不小, 此外, 早期, 不管是ZipKin和Uber的Jaeger還是Jaeger考量的主要還是REST API的架構, REST是透過HTTP傳輸的, 因此在設計上, 就可以透過HTTP header帶追蹤相關資訊, 但在一個複雜的分散式系統, 可能包含不同的通訊協定, 像是REST, GraphQL, gRPC, Thrift, 或是呼叫資料庫之類的, 不見得都是透過HTTP, 那怎麼傳遞追蹤資訊就是個問題, 跨系統間如果無法分享追蹤資訊, 那也是白搭

OpenTelemetry

OpenTelemetry其實也不是只有支援Distributed Tracing, 它能處理的資料型態, 主要就有下面這幾種:

  1. Traces
  2. Metrics
  3. Logs

也就是說除了追蹤資訊, 它也囊括了系統狀態跟Logs, 另外也支援很多不同語言, 算是野心蠻大的, 這邊來看一下它的架構:

主要它包含了兩部分, 一個是各程式語言使用的程式庫 - OT Library, 另一個是蒐集資訊的Collector, 而Collector是這樣的:

Collector包含了Receiver, Processor, Exporter, 這架構讓它有能力相容/支援不同的系統, 所以像是Finagle這種本來就有支援ZipKin的, 其實只要把原本倒到ZipKin的資料轉倒到OpenTelemetry的Collector就好, 這邊算是好解決, 如果系統是跑在K8S這類的環境上的話, 也可以考慮把Collector 當成sidecar來佈署

而各程式語言的程式庫的部分, 方便的是在某些程式語言有支援所謂的auto instrumentation, 針對有支援的程式庫或是框架, 可以在不寫任何程式碼或是寫少少的程式碼, 就可以達到分散式追蹤的目的(聽來有點玄), 像是Java就支援了這些(請參考連結), 而Javascript有這些(請參考連結)

但畢竟沒有甚麼是萬能的, 沒支援的還是得靠自己手動插追蹤的程式碼, 或是想辦法支援, 像是這篇正題的部分, 這邊想要追蹤從nodejs呼叫Finagle的部分, 就沒辦法使用現成的 (實際狀況更複雜, nodejs本身是graphql server, Finagle server又可能呼叫ElasticSearch或Kafka, 如果想全部串起來, 不算小, 這邊主要針對 nodejs <-> Finagle部分)

在Node.JS下用OpenTelemetry做Tracing

基本使用上其實相當簡單, 可以參考這個連結, 先用一個小範例來解釋:

const { HttpInstrumentation } = require('@opentelemetry/instrumentation-http');
const { GrpcInstrumentation } = require('@opentelemetry/instrumentation-grpc');
const { ExpressInstrumentation } = require('@opentelemetry/instrumentation-express');
const { ConsoleSpanExporter, SimpleSpanProcessor } = require('@opentelemetry/tracing');
const { NodeTracerProvider } = require('@opentelemetry/node');
const { registerInstrumentations } = require('@opentelemetry/instrumentation');

const provider = new NodeTracerProvider();

provider.addSpanProcessor(new SimpleSpanProcessor(new ConsoleSpanExporter()));
provider.register();

registerInstrumentations({
  instrumentations: [
      new HttpInstrumentation(), 
      new GrpcInstrumentation(),
      new ExpressInstrumentation()
      ],
});

以這範例來說, 它打開了支援http, grpc, express等程式庫的auto instrumentation, 亦即在你的程式中如果有用到這幾個程式庫, 它會自動加上對應的追蹤程式碼, 你不用額外做任何事, 從client到server都處理好, 或是你也可以像文件中用:

// This will automatically enable all instrumentations
registerInstrumentations({
  instrumentations: [getNodeAutoInstrumentations()],
});

getNodeAutoInstrumentations()包含了底下這幾種的資源:

  • @opentelemetry/instrumentation-dns': DnsInstrumentation
  • @opentelemetry/instrumentation-express': ExpressInstrumentation
  • @opentelemetry/instrumentation-graphql': GraphQLInstrumentation
  • @opentelemetry/instrumentation-grpc': GrpcInstrumentation
  • @opentelemetry/instrumentation-http': HttpInstrumentation
  • @opentelemetry/instrumentation-ioredis': IORedisInstrumentation
  • @opentelemetry/instrumentation-koa': KoaInstrumentation
  • @opentelemetry/instrumentation-mongodb': MongoDBInstrumentation
  • @opentelemetry/instrumentation-mysql': MySQLInstrumentation
  • @opentelemetry/instrumentation-pg': PgInstrumentation
  • @opentelemetry/instrumentation-redis': RedisInstrumentation

建議如果沒要追蹤這麼多東西的話, 還是一個個加就好, 畢竟資訊多雜訊也多

在這邊:

const provider = new NodeTracerProvider();
provider.addSpanProcessor(new SimpleSpanProcessor(new ConsoleSpanExporter()));

這兩行是建立Trace Provider, 告訴它要用哪個Processor或哪個Exporter去處理追蹤資訊, 這跟前面提到的Collector的架構上大致類似, 這邊用的是Consle exporter,也就是追蹤資訊會被直接印在螢幕上, 如果想輸出到ZipKin或是Jaeger就用相對應的Exporter就可以了, 或者也可以用OTLP的Exporter直接輸出到OpenTelemetry的collector

但這是在有支援的狀況下, 如果沒有呢? 就得手動去插了, 看一下下面這範例:

const opentelemetry = require('@opentelemetry/api');
const tracer = opentelemetry.trace.getTracer('example-basic-tracer-node');

// Create a span. A span must be closed.
const span = tracer.startSpan('main');
doWork();
// Be sure to end the span.
span.end();

這是簡單追蹤一個程序的方法, 在這範例是doWork(), 這邊就可以追蹤從startSpanend之間的耗費的時間了, 針對沒有支援auto instrumentation, 或是你想額外在你程式內追蹤些別的, 那就得用這種方式在需要追蹤的地方加入這些

很不幸的, 目前不管哪個語言, Java, Javascript, 都沒支援Thrift相關的, 所以如果要追蹤 Thrift, 可能就得是這樣, 除了可能需要改不少地方外, 插入這些code其實也不太好看啦 :p

追蹤 Thrift RPC

Thrift算是一個有點歷史的RPC框架(framework)了, 雖然應該還有不少大公司像是Twitter, Facebook, LINE, LinkedIn還有在使用, 不過現在大家大部分應該是比較常用比較潮的gRPC, 比較少用Thrift了, 所以在OpenTelemetry這種新東西找不到支援應該也情有可原

為了比較好確認解決這問題的概念是怎樣, 這邊先把問題/架構先簡化如下:

  1. Thrift client: 跑在nodejs下, 以typescript開發
  2. Thrift server: 跑在Twitter Finagle框架, 以scala開發 (事實上, 我也有實做一個go版本的server, 不過先不在這討論)

所以這邊會需要知道的是:

  1. client呼叫每個Thrift call需要的時間
  2. 在server上每個call又對應哪些呼叫或花費

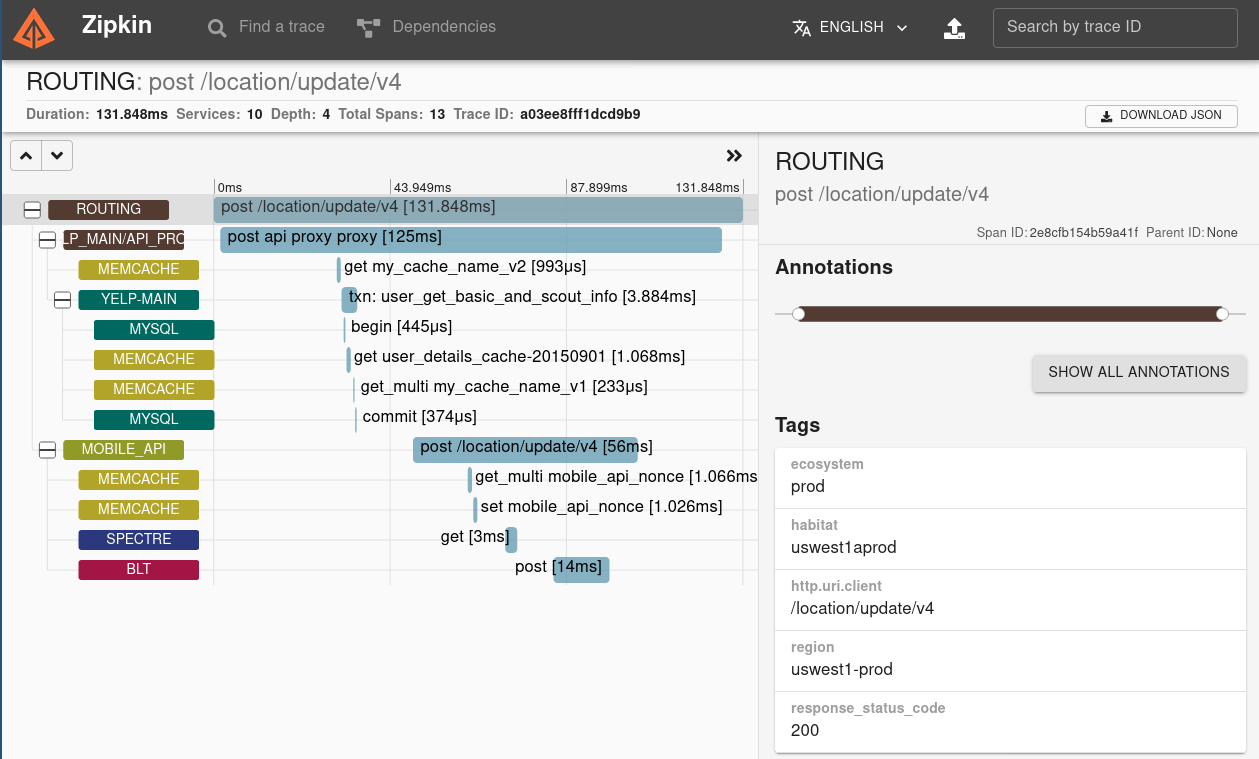
用以下ZipKin這張圖來當範例, 就可以這樣一層層追蹤下去

ZipKin

Client部分雖然可以使用手工插入tracing相關的程式碼, 但當然還是做成自動的最好, 而且client必須要可以把相關的trace ID, span ID給傳遞到server, 要不然線索就會斷掉了

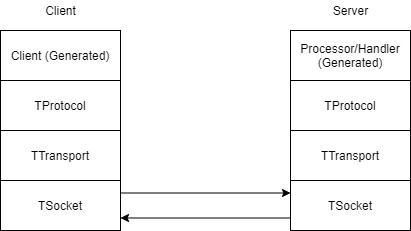
為了達到這目標, 首先我們先來看一下Thrift從Client到Server經過哪些地方:

Thrift

從這圖看來, 可能可以插入追蹤碼的點可以是產生出來的Client code或是TProtocol的位置(為何?後面再提)

在前面我也寫了一篇"在nodejs使用typescript呼叫thrift client“裡面有提到利用thrift -r --gen js:ts smaple.thrift來產生nodejs用的client code

以下面這個Thrift IDL來當範例:

namespace java sample.thrift
#@namespace scala sample.thrift
namespace go rpc

service SampleService {
    string hello(1: i64 a, 2: i64 b)
    void hello2()
}

thrift -r --gen js:ts sample.thrift就可以產生四個檔案, 分別是:

  1. sample_types.js
  2. sample_types.d.ts
  3. SampleService.js SampleService的定義
  4. SampleService.d.ts SampleService的javascript實作(Client + Processor)

再仔細去看SampleService.js, 以hello這個method為例, 你會發現在 SampleServiceClient 裡關於hello的部分有三部分:

  1. hello(a, b, callback) 實際給程式呼叫的介面, 這邊回傳是個Promise
  2. send_hello(a, b) 會由hello去呼叫, 實際上負責傳遞呼叫的相關資訊
  3. recv_hello(input,mtype,rseqid) 當send_hello送出呼叫資訊到server後, Connection會等到Server回應後, 會呼叫 recv_functionname, 去處理回傳回來的資訊

另外在 send_hello 的一開始會去呼叫 output.writeMessageBegin('hello', Thrift.MessageType.CALL, this.seqid()); , 這邊的output是TProtocol, 在呼叫 recv_hello 之前則是會呼叫 input.readMessageBegin() 這邊也可以得到呼叫的method的資訊

由上面的線索看來, 可以插入追蹤程式碼可能的幾個點:

  1. hello(a, b, callback) 的一開始到Promise結束
  2. send_hello(a, b)recv_hello(input,mtype,rseqid)的結束
  3. writeMessageBeginreadMessageBegin

這邊問題在於 hello, send_hello, recv_hello都是由thrift這個指令產出的, 而writeMessageBegin, readMessageBegin則是在thrift的程式庫內

我們要怎樣在裡面插入追蹤的程式碼?或是有沒辦法做到auto instrumentation那樣?

Javascript auto instrumentation in OpenTelemetry

OpenTelemetry其實是有開放介面給大家去開發相關的auto instrumentation, 不過這一塊實在看得有點頭痛, 沒文件, 又不好懂, 我最後沒採用這方法實作, 但因為在這邊花了不少時間, 還是簡單的介紹一下

前面有提到的有許多auto instrumentation的實作, 都是被放到 opentelemetry-js-contrib/plugins/node, 也就是說你可以用一樣的方法做出自己的auto instrumentation

其架構的原始碼可以參考opentelemetry-js/packages/opentelemetry-instrumentation, 至於如何去寫一個plugin則可以參考 這篇

基本的plugin大致上像這樣:

import type * as mssql from 'mypackage';
import {
    InstrumentationBase,
    InstrumentationConfig,
    InstrumentationModuleDefinition,
} from '@opentelemetry/instrumentation';
 
type Config = InstrumentationConfig ;
 
export class MYPlugin extends InstrumentationBase<typeof mypackage> {
       
    protected init(): void | InstrumentationModuleDefinition<any> | InstrumentationModuleDefinition<any>[] {
        throw new Error('Method not implemented.');
    }
}

Plugin必須繼承自InstrumentationBase, 最好的範例應該是 http的instrumentation的實作, 在這裏面, 你會看到像是:

this._wrap(
          moduleExports,
          'request',
          this._getPatchOutgoingRequestFunction('http')
        );

這目的就是為了把原本的函數替換成包裝過有插追蹤碼的程式, 原理其實很容易理解, 而它是用了 shimmer 這個package, 來達到這個替換的目的, 實際上去看 shimmer, 也並不是一個很複雜的做法就是了

本來我是考慮寫一個plugin來處理Thrift client的部分, 原本的考量點是, 由於 shimmer 需要先知道method的名字才能替代, 所以 hello, send_hello, recv_hello 就不適合用來做包裝, 畢竟要做也是要做一個通用的, 不然試作後, 單純包裝 hello 其實算容易 (在呼叫原版本hello前先startSpan, 並把span.end包裝到回傳的Promise), 所以適合用在這邊的可能是包裝 TProtocol.writeMessageBegin, TProtocol.readMessageBegin ,不過這邊一直弄不成功, 可能也沒搞很懂instrumentation plugin, 後來又發現更簡便的做法就先放棄

從 thift generator 下手

在用 shimmer 包裝 hello 時, 發現了一個問題, 由於我是用 typescript 而非javascript 在做這個實驗, typescript會去做型別檢查, 本來Javascript版本的 hello 的回傳是Promise, 但我在定義wrapped function的時候, 回傳型別設成 Promise<string> 則是會報錯, 結果實際上去看產生的程式碼:

hello(a: Int64, b: Int64): string;

這完全是錯的, 也就是由Apache thrift這個工具產生的typescript是有問題的

想到在Scala中, 產生Thrift相關程式碼是用scrooge並不會去用官方Apache thrift的工具, typescript會不會也有像scrooge這工具? 結果就找到了creditkarma/thrift-typescript

這個專案也是蠻有趣的, 它是透過 Typescript compiler API, 把Thrift IDL完全轉成typescript程式碼, 跟官方工具不同的地方是, 它產生的是純typecsript實做, 而非javascript實做搭配typescript定義, 因此產生的程式碼也好讀多了

所以我想, 何必一定糾結在auto instrumentation, 從code generator 去修改也是一個可行的做法, 要做到這件事, 那就要先看看, 我們預期它產生怎樣的程式碼, 於是我就去修改產生的程式碼來實驗, 像這樣:

export class Client {
    public _seqid: number;
    public _reqs: {
        [name: number]: (err: Error | object | undefined, val?: any) => void;
    };
    public output: thrift.TTransport;
    public protocol: new (trans: thrift.TTransport) => thrift.TProtocol;
    public tracer:opentelemetry.Tracer;
    private serverSupportTracing: boolean;

    constructor(output: thrift.TTransport, protocol: new (trans: thrift.TTransport) => thrift.TProtocol) {
        this._seqid = 0;
        this._reqs = {};
        this.output = output;
        this.protocol = protocol;
        this.tracer = opentelemetry.trace.getTracer('SampleServiceClient');
        this.serverSupportTracing = false;
    }
    public incrementSeqId(): number {
        return this._seqid += 1;
    }
    
    public hello(a: Int64, b: Int64): Promise<string> {
        const requestId: number = this.incrementSeqId();
        const span:opentelemetry.Span = this.tracer.startSpan("hello");
        return new Promise<string>((resolve, reject): void => {
            this._reqs[requestId] = (error, result) => {
                delete this._reqs[requestId];
                
                if (error != null) {
                    reject(error);
                }
                else {
                    resolve(result);
                }
                span.end();
            };
            this.send_hello(a, b, requestId);
        });
    }
}

這一段程式碼是截自 creditkarma/thrift-typescript 從我的IDL產生的程式碼, 加上了tracer跟span, startSpanspan.end就插在hello裡面

這一段先用手工插入實驗後沒問題, 接下來我們就可以去改 creditkarma/thrift-typescript 讓程式自動去產生

由於這邊牽涉多一點, 我就不一一解釋, 貼上我修改的commit, 大家有興趣可以參考 : https://github.com/julianshen/thrift-typescript/commit/5f2ebeb85f6e639be11d5184f5470ca8d4d466b9

這樣一來, 產生我們要的client code就沒啥問題了

傳遞追蹤資訊

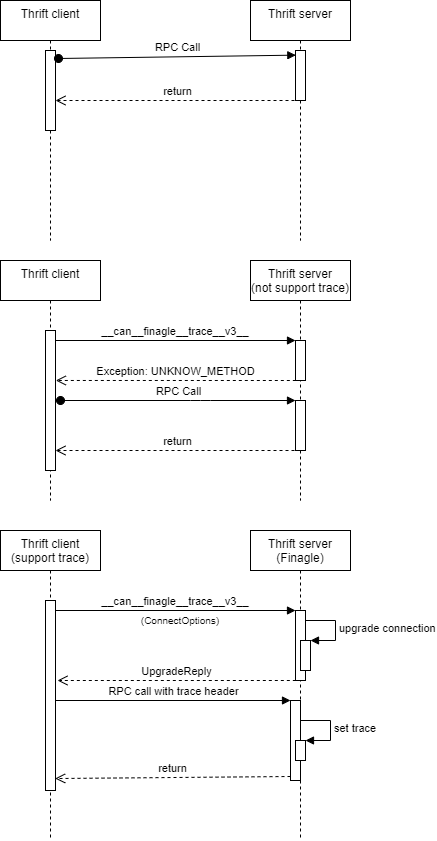
前面有提到Finagle有支援Zipkin Tracing, 只有client和server都是Finagle才可以在Thrift間傳遞追蹤資訊, 那實際上Finagle又是怎做的呢? 它的做法是在Thrift的通訊協定上做了一些小修改, 先來看看底下這三張圖

Twitter Thrift

第一張是通常狀況, 在兩端都不支援傳遞追蹤資訊, 或是Client不支援, 就是走正常的路線, 第二三張則是在Client有支援(Finagle client), client會先送__can__finagle__trace__v3__這個呼叫確認server有支援, server如果有支援的話, 就會回傳正確的結果, 如果沒支援則會是 UNKNOW_METHOD

Client在確認server有支援後, 後面的request就會先多帶一個header包含Tracing相關的資訊了

這部分, 我目前也只實做go版本的server, client版本尚未做, 這邊會需要做的部份包含:

  1. 呼叫 __can__finagle__trace__v3__ 確認是否支援tracing
  2. 將client端的tracing資訊帶入相關的header中

如果client是用OpenTelemetry, 而server這邊是用Finagle加zipkin的話, 就得要注意Trace ID, Span ID的轉換, 這兩邊用的長度跟型別有點不太一樣, 轉換的範例如下:

func UInt64ToTraceID(high, low uint64) pdata.TraceID {
	traceID := [16]byte{}
	binary.BigEndian.PutUint64(traceID[:8], high)
	binary.BigEndian.PutUint64(traceID[8:], low)
	return pdata.NewTraceID(traceID)
}

(Source: https://github.com/open-telemetry/opentelemetry-collector/blob/6ae558c8757cad4ed29f7c9496b38827990f156f/internal/idutils/big_endian_converter.go#L24)

只要在把這整段整合到code generator, 應該就可以大功告成了

雖然一開始覺得是個小題目, 沒想到居然讓我用這麼大篇幅介紹, 而且全部實做還沒完成, 看來是有點太過低估了