Retrofit一直是一套在開發REST client一個相當好用的工具, 不只可以應用在Android上, 而是在任何Java相關的, 不管是獨立的App, 或是Server端的開發, 都相當好用
Retrofit是相當簡單容易使用的, 但它的能力也是強大的, 能做到的事情相當的多, 寫這篇主要是最近都在寫Spring Boot相關的, 在想說研究一下Spring的RestTemplate和Retrofit時, 發現了Jake Wharton的一份投影片, 之前一直以為Retrofit最早應該是由Jake Wharton開發出來的, 但後來根據Jake Wharton的文章才知道第一個commit是Square的CTO, Bob Lee, 但不管是誰, 這兩個都是大神級的人物啊
這篇主要是根據Jake Wharton的Making Retrofit Work For You (Ohio DevFest 2016)整理出來的, 這篇滿滿都是codes的投影片已經非常清楚的講了一堆關於Retrofit的技巧了, 這邊針對幾個有用的整理出來, 並加上一些我自己的內容(看完我文章後想繼續深入研究可以再回頭看投影片)
Retrofit的基本使用
在看這些技巧之前, 我們先來看看Retrofit的基本使用, 這邊使用官方的例子來說明, 官方的範例是以GitHub Api為例子, 以GitHub Api的“List user repository”為例, 它的URL是長這樣的:
GET /users/:username/repos
因此Retrofit的API interface (或稱Service class)可以定義成這樣:
public interface GitHubService {
  @GET("users/{user}/repos")
  Call<List<Repo>> listRepos(@Path("user") String user);
}
從API doc裡面發現, 其實還可以用Query parameter加上"type", “sort”, “direction"三個參數, 如果我們希望再加上一個"sort"就可以變成這樣:
public interface GitHubService {
  @GET("users/{user}/repos")
  Call<List<Repo>> listRepos(@Path("user") String user, @Quer("sort") String sort);
}
這樣我們要取用GitHubService就可以用這樣:
Retrofit retrofit = new Retrofit.Builder()
    .baseUrl("https://api.github.com/")
	.addConverterFactory(GsonConverterFactory.create())
    .build();

GitHubService service = retrofit.create(GitHubService.class);
基本上我們自己不用寫跟Http connection相關的程式碼就可以達成, 這就是Retrofit簡單的地方, 只需要定義一個Java interface, 跟幾個簡單的annotation即可
它的原理也不算很高深, 基本上就是利用了Java Proxy class, 把一些寫REST client共通的程式碼封裝起來, Proxy class雖然一般來說是比較冷門的技巧, 也不是什麼新功能, 但卻是相當好用的工具, 其實現在很多地方也都廣泛地使用了
這邊有幾篇關於Proxy class可以參考參考
- Explore the Dynamic Proxy API
- New Tricks with Dynamic Proxies in Java 8 (part 1) (這篇還有part 2喔!)
- Java的动态代理(dynamic proxy)
另外, 當然得記得加入相關的程式庫
Maven:
<dependency>
  <groupId>com.squareup.retrofit2</groupId>
  <artifactId>retrofit</artifactId>
  <version>2.2.0</version>
</dependency>
Gradle:
compile 'com.squareup.retrofit2:retrofit:2.2.0'
json2pojo
有了Retrofit後, 在寫REST client最繁雜的部分大概就剩下為了JSON資料格式定義相對應的Java Class了, 不過, 這部分, 也是交給工具就好了, 這邊有兩個我常用的好用的工具:
- jsonschema2pojo 這蠻多功能的, 也可以針對Gson或是Jackson產生不同的對應
- Json2Pojo 如果使用Intellij IDEA或是他衍生出的Android Studio, 也可以使用這個plugin, 直接用"New -> Generate POJOs from JSON"即可
OkHttpClient與Interceptor
在現在處處都需要Internet的世界, 一個Http client的實作應該相當基本的, 除了Java本身的HttpUrlConnection外, 也有Apache Http, 不過Retrofit用的是Square自己開源的OkHttp,不得不說Square真是一家厲害的公司, 開源出來的東西的品質都相當的高, OkHttp也是一個相當優秀的Http程式庫, 大概跟Http相關的, 你想得到的都支援了, 包含HTTP/2
如果沒特別指定, Retrofit使用的會是預設的OkHttpClient, 當然你也可以指定自己的給它, 像是
OkHttpClient client = new OkHttpClient.Builder().build();

Retrofit retrofit = new Retrofit.Builder()
    .baseUrl("https://api.github.com/")
	.addConverterFactory(GsonConverterFactory.create())
	.client(client)
    .build();

GitHubService service = retrofit.create(GitHubService.class);
通常, 如果你對Http部分有特別的需求, 就會需要這樣做, 比如說, 你希望你每一個HTTP連接有它的connection timeout或是read timeout, write timeout, 那就會利用:
OkHttpClient client = new OkHttpClient.Builder()
		.connectTimeout(10, TimeUnit.SECONDS)
        .writeTimeout(10, TimeUnit.SECONDS)
        .readTimeout(30, TimeUnit.SECONDS)
		.build();
但這並不是唯一用途, 還有一個蠻好用的用途是Interceptor, 什麼是Interceptor呢? 用一張圖來解釋一下:
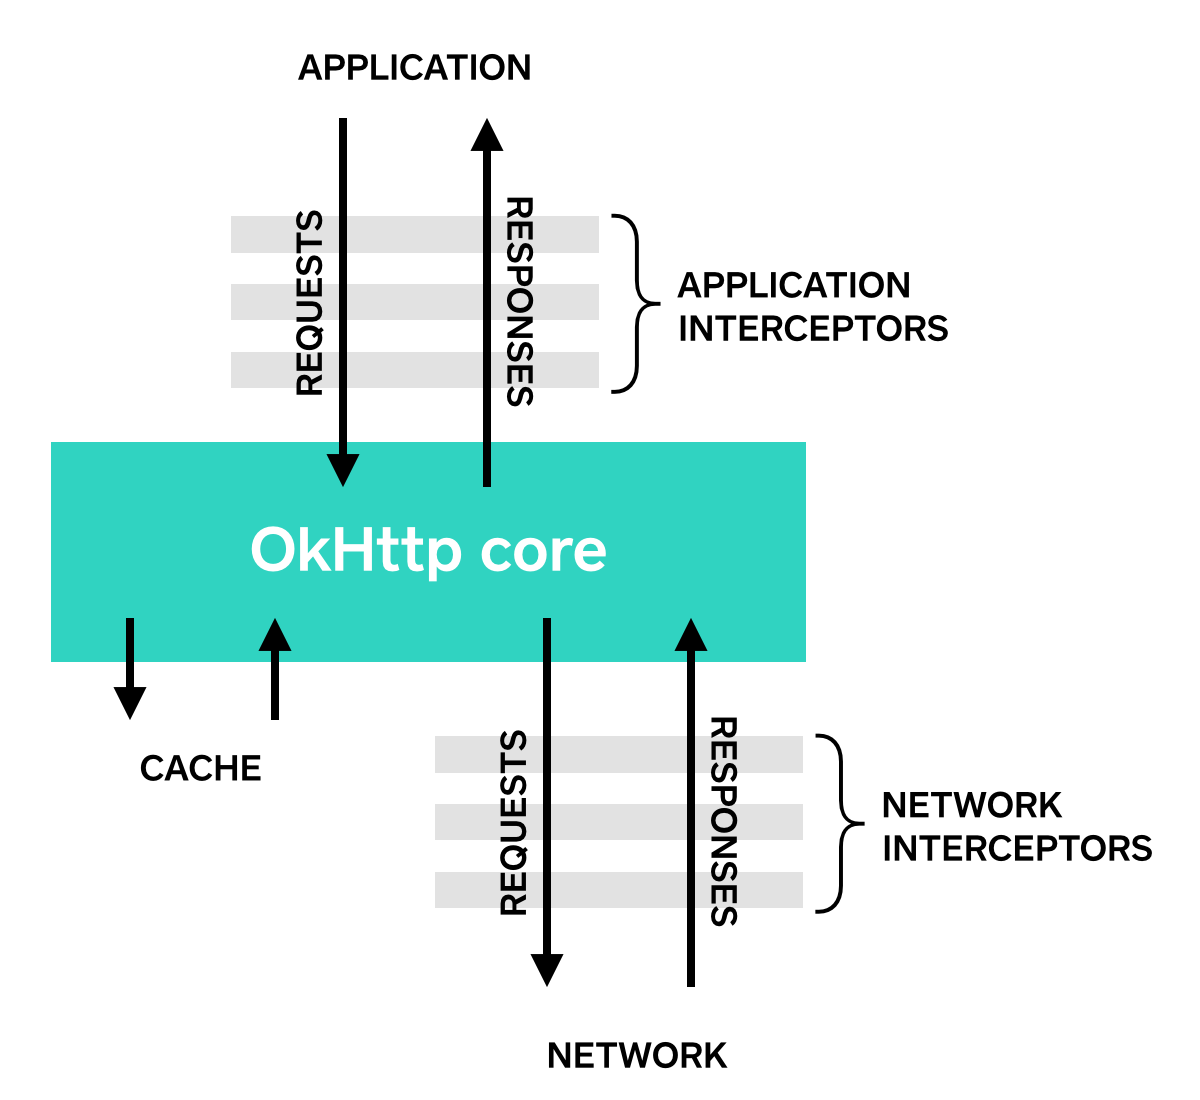
簡而言之, Interceptor是用來放在傳輸的中間去監測或修改HTTP的需求(request)與回應的(response), 在OkHttp裡, Interceptor有兩種, 一種是Application Interceptor, 是介於你的程式和OkHttp的實作之間, 另一種是Network Interceptor, 是介於OkHttp跟實際網路傳輸之間, 兩者實作的介面都相同, 實際上就要看你的用途放在哪了
一個最淺而易見的應用是Log, 常常我們會需要看HTTP傳輸了什麼來確定我們REST client的實作是否正確, 透過Interceptor就可以做到這樣的事, 而且OkHttp已經提供好一個叫做HttpLoggingInterceptor可以用了:
HttpLoggingInterceptor logging = new HttpLoggingInterceptor();
logging.setLevel(Level.BASIC);
OkHttpClient client = new OkHttpClient.Builder()
  .addInterceptor(logging)
  .build();
利用addInterceptor可以加入Interceptor, 而且, 當然你也可以設定自己的Logger:
HttpLoggingInterceptor logging = new HttpLoggingInterceptor(new Logger() {
  @Override public void log(String message) {
    Timber.tag("OkHttp").d(message);
  }
});
不過HttpLoggingInterceptor並不包含在原本的OkHttp的jar內, 所以要另外加入:
Maven:
<dependency>
  <groupId>com.squareup.okhttp3</groupId>
  <artifactId>logging-interceptor</artifactId>
  <version>(insert latest version)</version>
</dependency>
Gradle:
compile 'com.squareup.okhttp3:logging-interceptor:(insert latest version)'
除了做Log外, 另外就是如果有一些共用的Header, 像是Authentication的header, 就可以透過Interceptor來加入, 如:
class ServiceInterceptor implements Interceptor {
	@Override
	public Response intercept(Chain chain) {
		Request request = chain.request();

		request = request.newBuilder()
		    .addHeader("Authentication", "myheader")
			.build();
		return chain.process(request);
	}
}
這是用來把原本的request替換成加了header的新request, 同樣的, 如果是OAuth也是可以利用這技巧, 這部分可以去參考okhttp-signpost
那如果針對有些需要加, 有些不需要呢? 那我們可以用另一個技巧來處理, 假設, Retrofit的Service定義是這樣的:
interface Service {
	@GET("/user")
	Call<User> user();

	@POST("/login")
	@Headers("No-Auth: true")
	Call<User> login();
}
這範例裡面, user() 是需要加authentication header的, login不需要, 因此在這邊就利用Headers這個Authentication加上一個假header, 這是為了給後面的Interceptor辨識的,結果就像是:
class ServiceInerceptor implements Interceptor {
	@Override
	public Response intercept(Chain chain) {
		Reuqest request = chain.request();

		if (request.header("No-Auth") == null) {
			request = request.newBuilder()
		    .addHeader("Authentication", "myheader")
			.build();
		}

		return chain.proceed(request);
	}
}
Converter
剛剛講的Inerceptor嚴格說來不屬於Retrofit, 但接下來要說的這個Converter就完全是Retrofit的東西了
一般常見的REST API的回傳格式大多是JSON, 但也有人是用Protocol buffer, 也有人還是用著XML, Retrofit好用的地方就是沒寫死這部分的格式, 而是把它變成像是Plugin的形式, 就叫做Converter, 官方提供的Converter有下列這些(後面是maven repo的group:artifect):
- Gson: com.squareup.retrofit2:converter-gson
- Jackson: com.squareup.retrofit2:converter-jackson
- Moshi: com.squareup.retrofit2:converter-moshi
- Protobuf: com.squareup.retrofit2:converter-protobuf
- Wire: com.squareup.retrofit2:converter-wire
- Simple XML: com.squareup.retrofit2:converter-simplexml
其中Gson, Jackson, Moshi是處理JSON相關的, Protobuf和Wire則是處理Protocol buffer, 有趣的是, Square常常很多東西都喜歡自己來, 因此關於JSON parser, 他們就不滿足於Google的GSON或是常見的Jackson, 而是自己開發另一套Moshi, Protocol buffer也一樣, Wire也是他們自己開發的
如果要用Converter, 就會使用到它對應的CoverterFactory, 以GSON為例是:
Retrofit retrofit = new Retrofit.Builder()
    .baseUrl("https://api.github.com")
    .addConverterFactory(GsonConverterFactory.create())
    .build();

GitHubService service = retrofit.create(GitHubService.class);
由於Converter等於是一種plugin, 如果你不滿意於官方提供的幾個JSON方案, 而想要用其他的, 也是可以的, 像是如果你要用阿里巴巴開源的Fast JSON你也可以參考這個Converter的實作: FastJson Retrofit Converter
那Converter只能支援這些格式嗎? 你只要想得出來的格式其實都可以自己寫出Converter來支援, 比如說HTML也可以,
class PageConverter implements Converter<ResponseBody, Page> {
    static final Converter.Factory FACTORY = new Converter.Factory() {
      @Override
	  public Converter<ResponseBody, ?> responseBodyConverter(
          Type type, Annotation[] annotations, Retrofit retrofit) {
        if (type == Page.class) return new PageConverter();
        return null;
      }
    };

    @Override
	public Page convert(ResponseBody responseBody) throws IOException {
      Document document = Jsoup.parse(responseBody.string());
      List<String> links = new ArrayList<>();
      for (Element element : document.select("a[href]")) {
        links.add(element.attr("href"));
      }
      return new Page(document.title(), Collections.unmodifiableList(links));
    }
  }
上面這個Converter的例子, 就是一個把HTML裡的title和links(利用Jsoup)抓出來的範例, 也可以參考Retrofit提供的完整範例
除了這例子外還可以有更進階的玩法, 比如說這例子:
interface Service {
	@GET("/user")
	Call<User> user();

	@GET("/friends")
	Call<User> friends();
}
假設寫API的人真的很惡搞, /user傳回的是JSON, 而/friends傳回的是protobuf怎辦呢?(淦, 誰會這麼幹啦?)
這時候你可以用一個你自訂的annotation來處理, 像是這樣:
interface Service {
	@GET("/user")
	@Json
	Call<User> user();

	@GET("/friends")
	@Protobuf
	Call<User> friends();
}
這邊@Json, @Protobuf都是自定義的, 不是Retrofit提供的, 那我們在自己提供的ConverterFactory來處理, 像是:
public class AnnotatedConverterFactory extends Converter.Factory {
	final Converter.Factory gson = ... //init gson converter factory
	final Converter.Factory proto = ... //init protobuf factory

	@Override
	  public Converter<ResponseBody, ?> responseBodyConverter(
          Type type, Annotation[] annotations, Retrofit retrofit) {
			  for(Annotation annotation:annotations) {
				  if(annotation.getClass() == Json.class) {
					  return gson.responseBodyConverter(type, annotations, retrofit);
				  } else {
					  return proto.responseBodyConverter(type, annotations, retrofit);
				  }
			  }
			  return null
		  }
}
更進階的用法可以參考Retrofit的Sample: AnnotatedConverters.java
Mock Mode
Retrofit也提供一個可以利用在測試的Mock mode
假設我們有一個Service interface是這樣的:
public interface GitHub {
	@GET("/repos/{owner}/{repo}/contributors")
	Call<List<Contributor>> contributors(
		@Path("owner") String owner,
		@Path("repo") String repo);
}
我們可以建立一個Mock Service像是:
/** A mock implementation of the {@link GitHub} API interface. */
public class MockGitHub implements GitHub {
	private final BehaviorDelegate<GitHub> delegate;
	private final Map<String, Map<String, List<Contributor>>> ownerRepoContributors;

	MockGitHub(BehaviorDelegate<GitHub> delegate) {
		this.delegate = delegate;
		ownerRepoContributors = new LinkedHashMap<>();

		// Seed some mock data.
		addContributor("square", "retrofit", "John Doe", 12);
		addContributor("square", "retrofit", "Bob Smith", 2);
		addContributor("square", "retrofit", "Big Bird", 40);
		addContributor("square", "picasso", "Proposition Joe", 39);
		addContributor("square", "picasso", "Keiser Soze", 152);
	}

	@Override public Call<List<Contributor>> contributors(String owner, String repo) {
		List<Contributor> response = Collections.emptyList();
		Map<String, List<Contributor>> repoContributors = ownerRepoContributors.get(owner);
		if (repoContributors != null) {
		List<Contributor> contributors = repoContributors.get(repo);
		if (contributors != null) {
			response = contributors;
		}
		}
		return delegate.returningResponse(response).contributors(owner, repo);
	}

	void addContributor(String owner, String repo, String name, int contributions) {
		Map<String, List<Contributor>> repoContributors = ownerRepoContributors.get(owner);
		if (repoContributors == null) {
		repoContributors = new LinkedHashMap<>();
		ownerRepoContributors.put(owner, repoContributors);
		}
		List<Contributor> contributors = repoContributors.get(repo);
		if (contributors == null) {
		contributors = new ArrayList<>();
		repoContributors.put(repo, contributors);
		}
		contributors.add(new Contributor(name, contributions));
	}
}
這邊很簡單, 建立一個GitHub這個Interface的實作, 但資料不是透過HTTP去取得, 取而代之的是回傳我們預設好的假資料, 利用BehaviorDelegate<GitHub>來回傳, 這樣可以在測試中避免因為Server帶來的不確定性所造成的錯誤
建立實際上使用的Service實體就不是用原本的retrofit.create()了, 而是改用mockRetrofit.create(GitHub.class)像是這樣:
// Create a very simple Retrofit adapter which points the GitHub API.
Retrofit retrofit = new Retrofit.Builder()
	.baseUrl(API_URL)
	.build();

// Create a MockRetrofit object with a NetworkBehavior which manages the fake behavior of calls.
NetworkBehavior behavior = NetworkBehavior.create();
MockRetrofit mockRetrofit = new MockRetrofit.Builder(retrofit)
	.networkBehavior(behavior)
	.build();

BehaviorDelegate<GitHub> delegate = mockRetrofit.create(GitHub.class);
MockGitHub gitHub = new MockGitHub(delegate);
這邊有一個networkBehavior, 這是可以用來模擬網路情況的, 比如說你可以用:
behavior.setDelay(500, TimeUnit.MILLISECONDS);
behavior.setFailurePercent(3);
這個可以用來測試可能的網路情況是否會帶來其他的邊際效應
補充 - CallAdapter
Retrofit 1時, Interface裡面定義的method回傳都是直接是要回傳的型態如:
public interface GitHub {
	@GET("/repos/{owner}/{repo}/contributors")
	List<Contributor> contributors(
		@Path("owner") String owner,
		@Path("repo") String repo);
}
在Retorfit 2之後, 卻已經變成是:
public interface GitHub {
	@GET("/repos/{owner}/{repo}/contributors")
	Call<List<Contributor>> contributors(
		@Path("owner") String owner,
		@Path("repo") String repo);
}
亦即就是, 原本在Retrofit 1採用的是Synchronous call, 就是你自己去管thread, 前景背景, 這些麻煩事, 但在2版後, 這部分就改了, 預設是Call這個Class, Call這個Interface的原型是這樣的
public interface Call<T> extends Cloneable {
  Response<T> execute() throws IOException;
  void enqueue(Callback<T> callback);
  boolean isExecuted();
  void cancel();
  boolean isCanceled();
  Call<T> clone();
  Request request();
}
你拿到Call物件後, 其實並還沒透過HTTP去抓取東西, 而是要透過execute()或是enqueue()才會真的去發request, 這兩者本質上是不同的, execute()是一個Synchronous call, 也就是執行到有結果才會結束, 會卡程式執行, 而enqueue()則是Asynchronous call, HTTP的部份是在背景執行, 結束後會call callback
如果需要中斷(碰到下載很久的內容), 可以呼叫cancel()
對這部份內部實作有興趣的話可以參考OkHttpCall, 其實它是直接利用了OkHttp那邊的實作
當然, 誠如前面說的(有說過嗎?), Retrofit是一個高度模組化的套件, 因此這部分也可以透過所謂的Call Adapter換成你熟悉的進程管理(應該叫這樣嗎?不知道該怎稱呼), 如RxJava
例如:
Retrofit retrofit = new Retrofit.Builder()
        .baseUrl("http://example.com")
        .addCallAdapterFactory(RxJavaCallAdapterFactory.create())
        .build();
或是:
Retrofit retrofit = new Retrofit.Builder()
        .baseUrl("http://example.com")
        .addCallAdapterFactory(RxJavaCallAdapterFactory.createWithScheduler(io()))
        .build();
當然要記得加入相關的Dependency:
compile 'com.squareup.retrofit2:adapter-rxjava:latest.version'
官方支援的Call adapter除了原本的"Call"外還有:
- RxJava https://github.com/square/retrofit/tree/master/retrofit-adapters/rxjava
- RxJava2 https://github.com/square/retrofit/tree/master/retrofit-adapters/rxjava2
- Guava https://github.com/square/retrofit/tree/master/retrofit-adapters/guava
- Java8 https://github.com/square/retrofit/tree/master/retrofit-adapters/java8
另外非官方的, 比如說你如果喜歡用Facebook的Bolts, 也有retrofit-bolts-call-adapter
那如果我要寫自己的Call Adapter呢?討厭啦, 當然可以, 你想怎樣都可以啦! XD
補充2 - Interceptor
除了可以改造Request外, 這邊也可以傳自己假造的Response回去喔, 這種可以用在某些情境, 比如說沒網路狀況下, 你也想傳自己假造的預設資料